Creative B&W Educational Series


Seeing And Working In B&W Part 1a, Basic Compositional Elements

Understanding the B&W BASIC Compositional Elements and the IMPACT that they can have on the viewers!

Honestly, with little exception, most people really love the purity of a finely crafted B&W image. There is something freeing when you stand before one trying desperately to understand why you are drawn to it!

This feeling goes back to our roots. The old masters of film had to WORK at their craft, developing creative habits that allowed few mistakes and the greatest impact with the least amount of failures and setbacks. This was due the the cost and time involved in their work. You have to remember that the cost of photography in the early days was very expensive so they NEEDED to master their craft or be doomed to failure!

Today it is quite different! We have many ways of capturing our images in either true monochrome or in color and then converting it to B&W in post processing. This opens up a new artistic world that was never available in Ansel’s time! Believe me when I say that he would have fully embraced todays technology!

So how do we best achieve these world class monochrome images? Honestly the skills necessary are quite easy to master. The most difficult thing to overcome is opening your eyes and mind to think and see in terms of monochrome images. It will be our task to teach you the necessary tools and thought processes.

Before I go any further let me tell you that Jamie Konarski Davidson and I are offering a location work shop in the Low Country of South Carolina from December 1 through the 4th. This will be centered in Georgetown SC and be limited to only a few people. For more info please visit:

https://www.newlifephotos.com/photography-workshops/monochrome-photo-workshop/

Ok! Enough of the preliminary stuff and time to get on to the meat of the post!

_______________________________________________________________________

Fuji X100s, 850nm Kolari AR 850nm Infrared conversion – Thru The Door

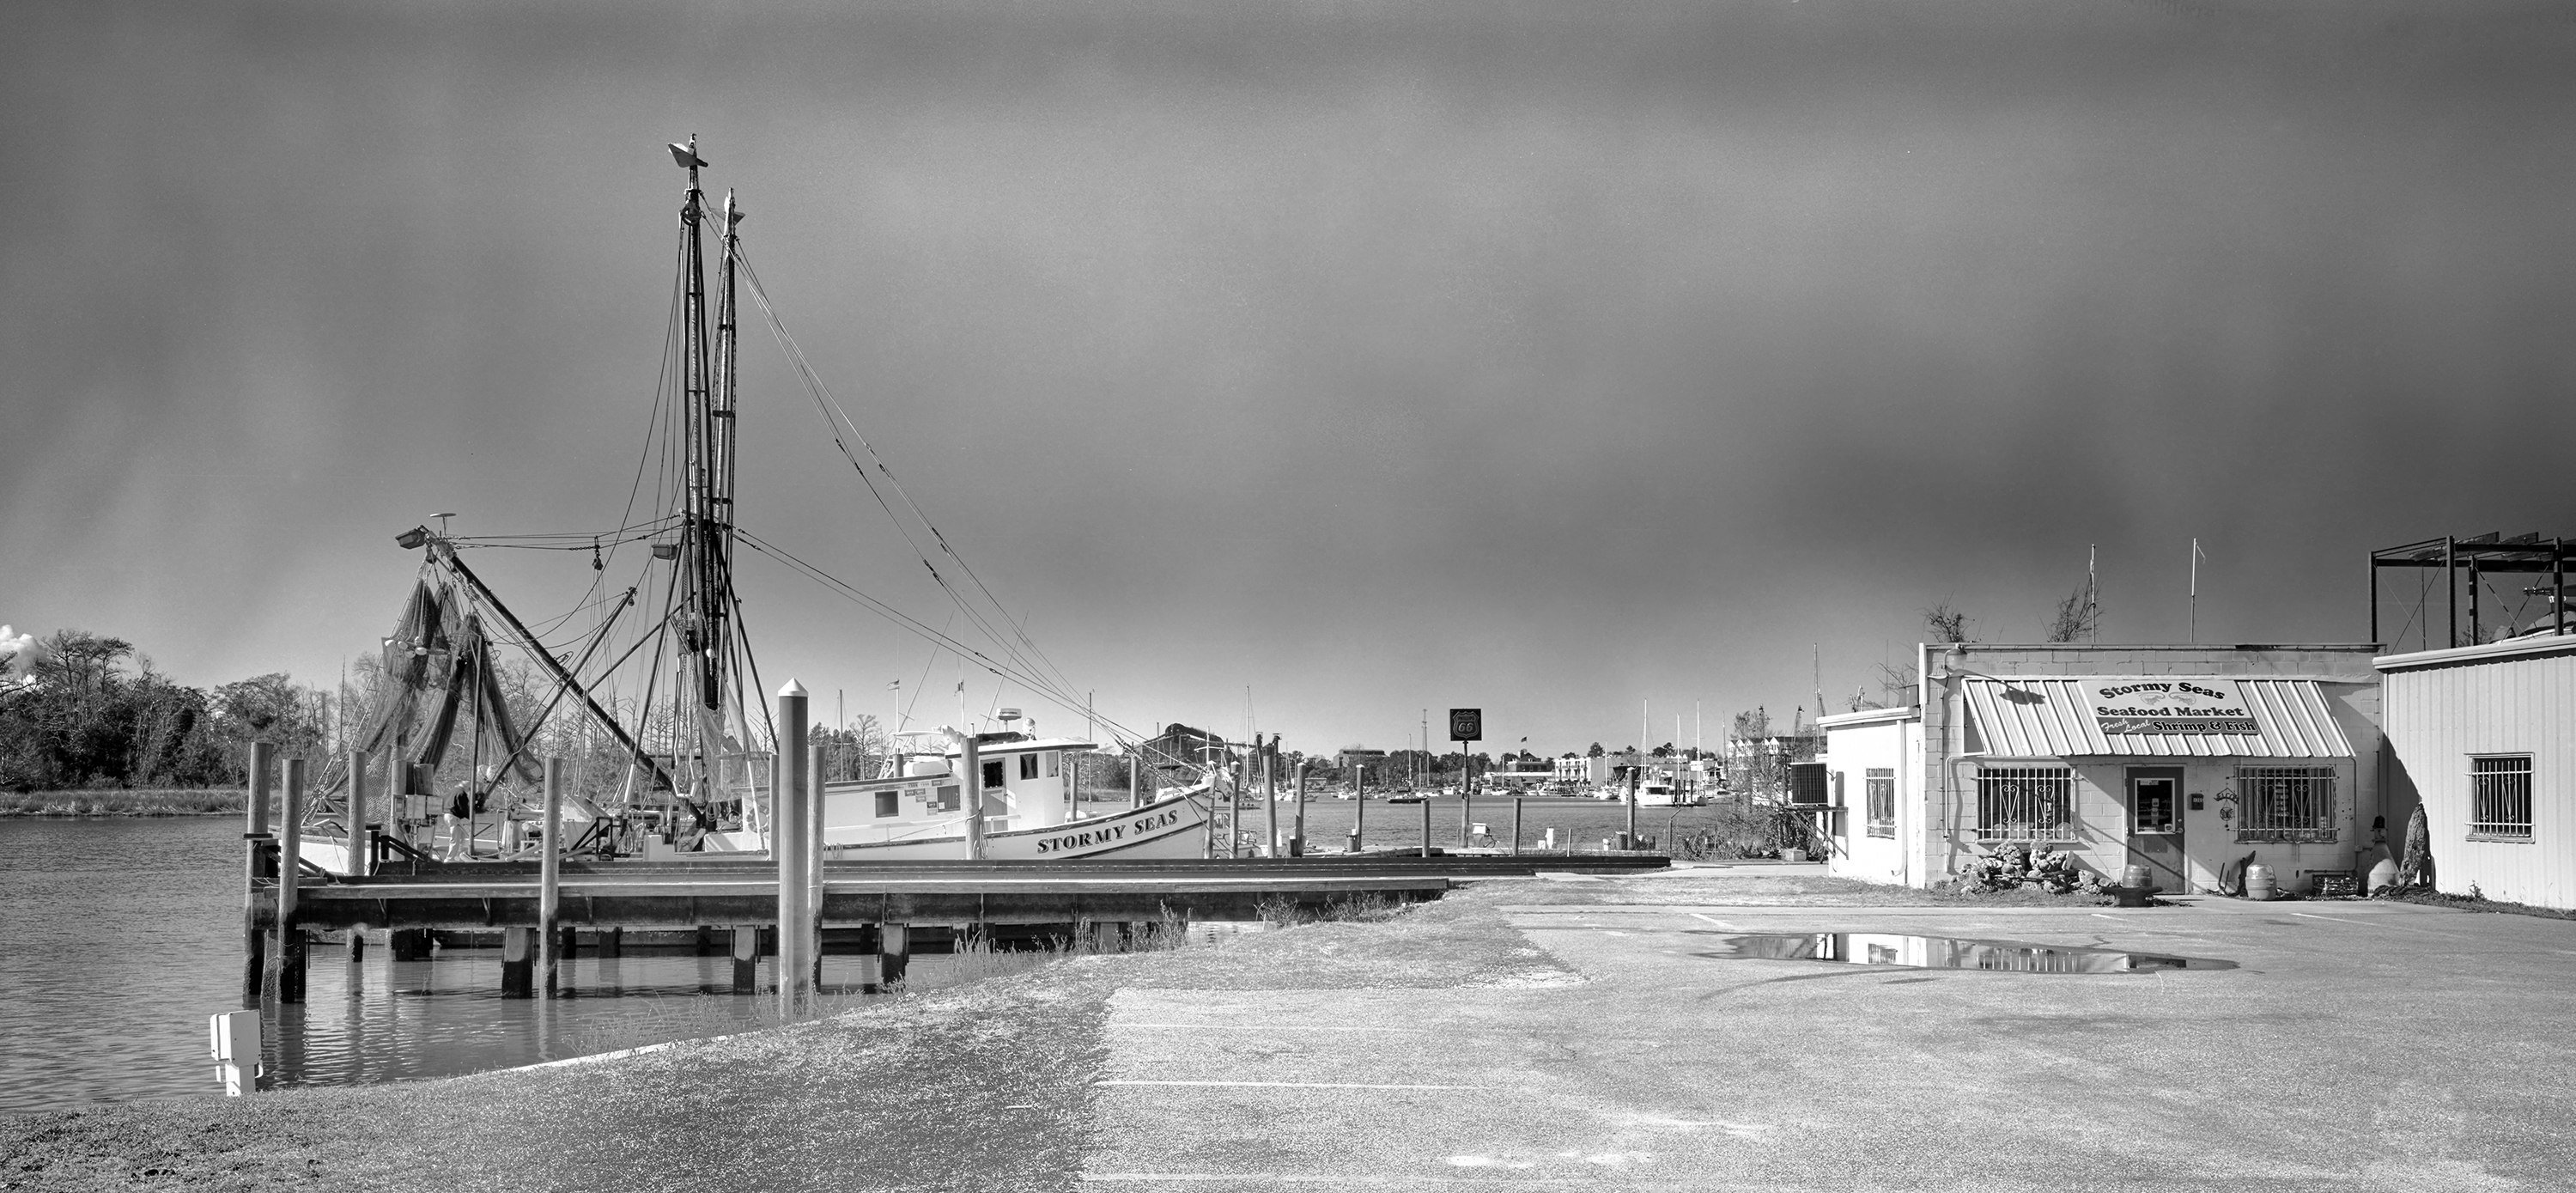
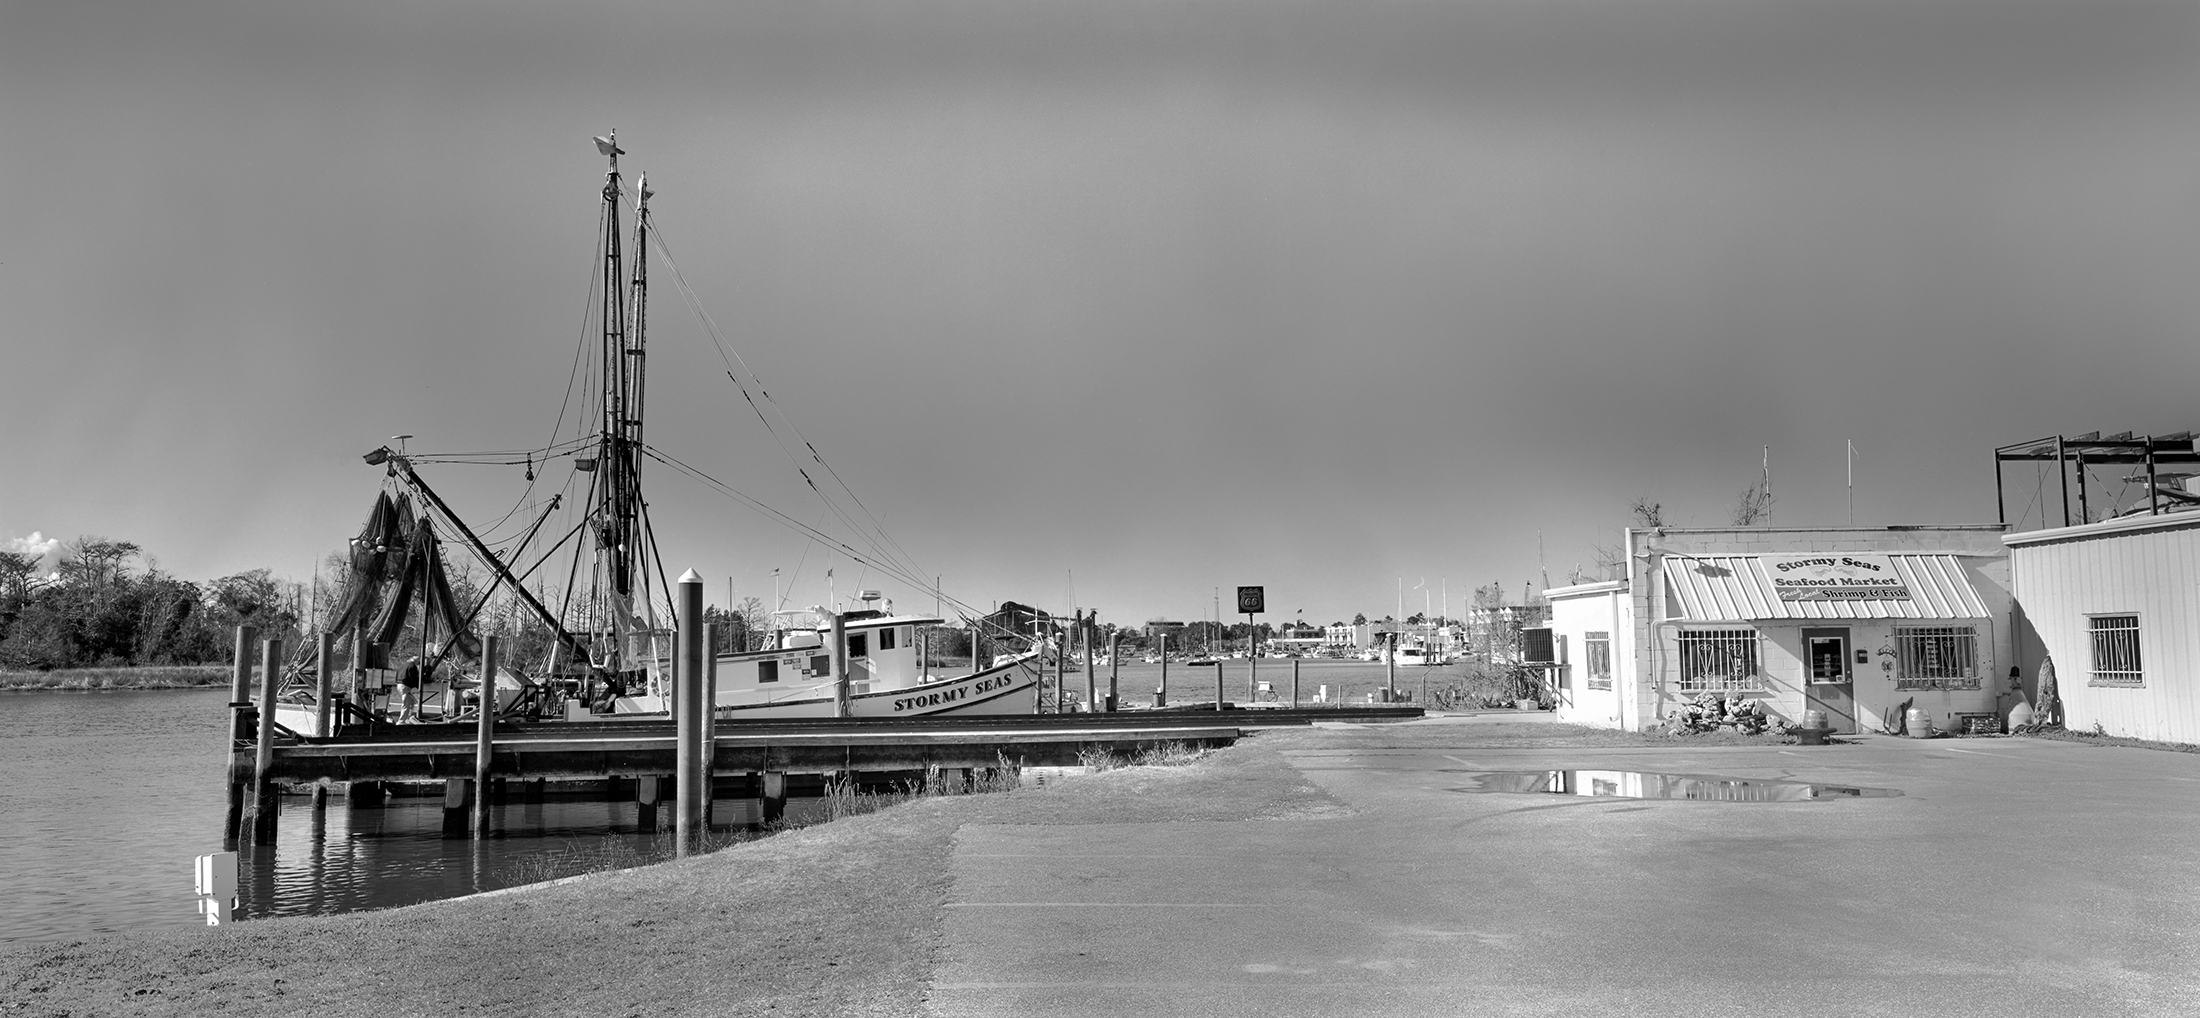
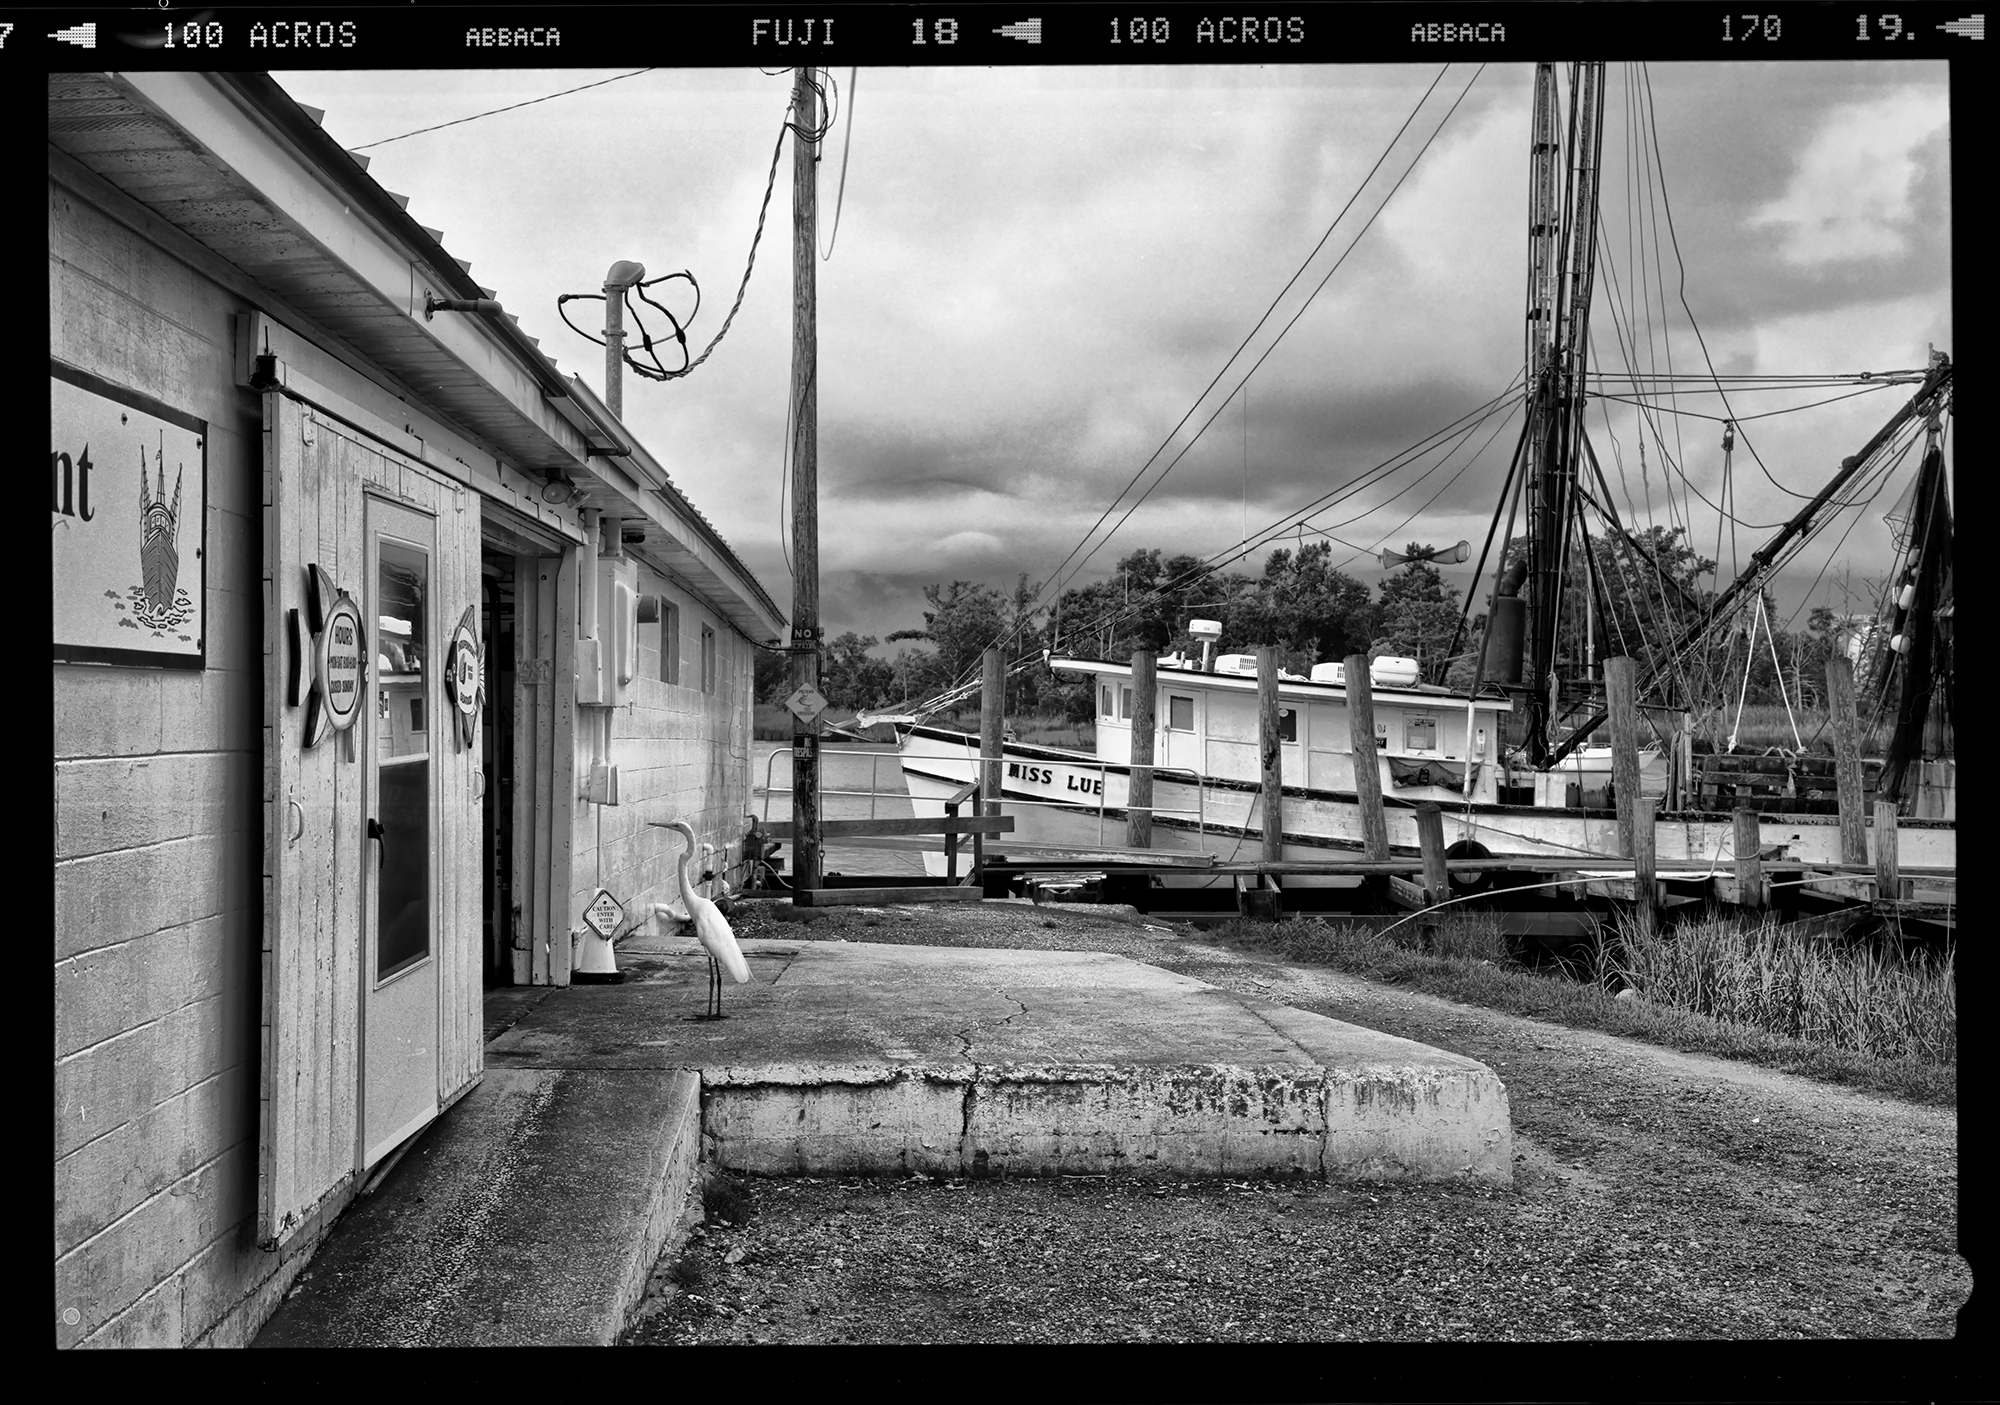
Ok, take a look at the image above of the shrimp boat viewed through the door of their facility in McClellanville SC. (Yes this will be a shooting location during the workshop!)

What do you notice about the image? Hmm, let us consider it!

1. Dark and moody door frame with just a touch of detail. The overall darkness helps frame the boat and keeps your eyes from re-circulating around the frame.

2. Dingy dirty mid ground full of textures.

3. The Shrimper …. Wabi Sabi at its best (study of death and decay)

4. Brightly lit beams of the ceiling leading your eyes to the boat.

5. Stormy sky above the boat. Do you notice the darker area of the sky? These areas are blue sky! They are darkened by the use of real or digital color filters. For film, a glass filter on the lens, for Digital, a software applied color filter.

What do YOU think? Yes it is a dark and dirty image with strange angles and alignments! But the composition tends to draw your eyes to the boat and hold them there! That is a key element of understanding here and our first 2 rules of B&W compositional tools….

Rule 1 – HOLD YOUR VIEWERS EYES ON THE SUBJECT

Rule 2 – Dark and MOODY contrasts are your friend in B&W

_______________________________________________________________________

The Wheel House Bell

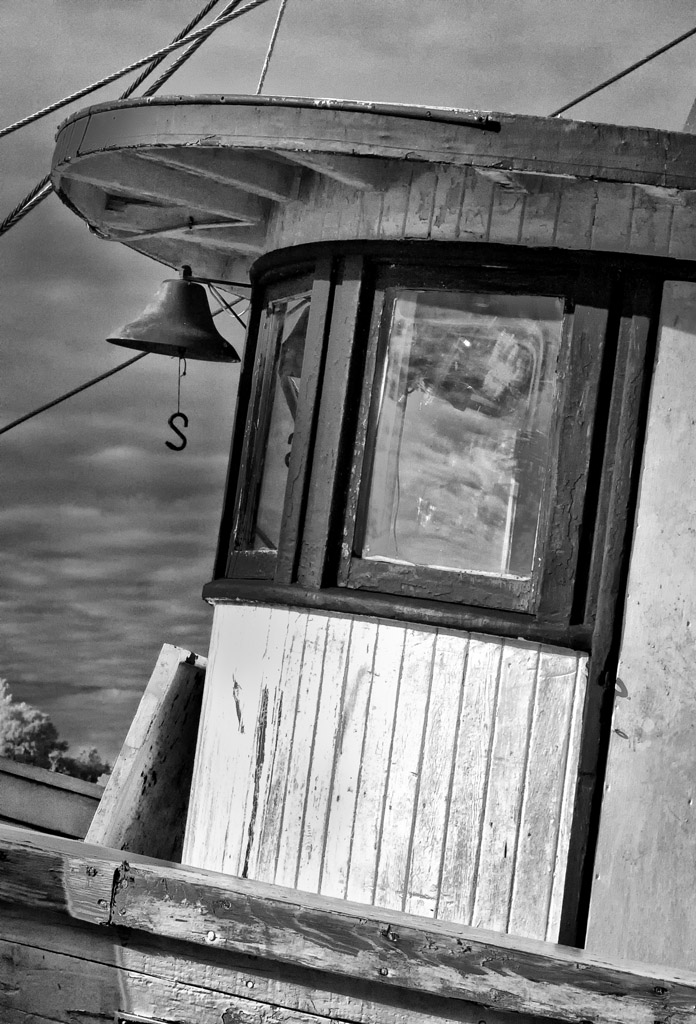
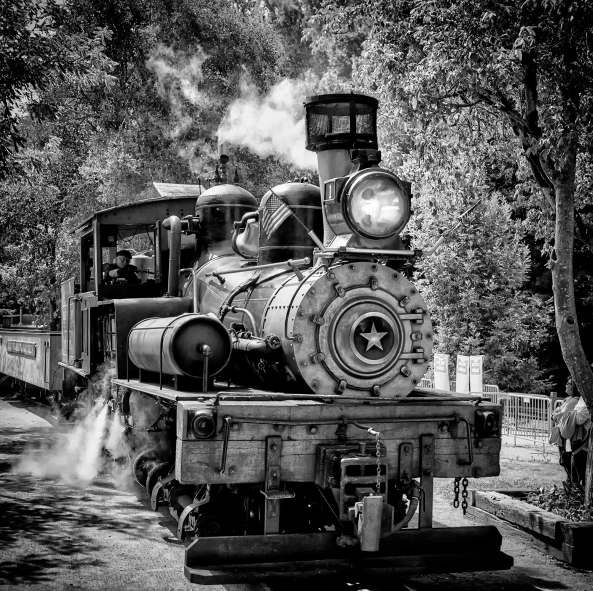
This image is “The Wheel House Bell”. Here, I was looking to convey a feeling of gloom and uncertainty. The SINGLE compositional element that drew me to the image was the single hand print on the window. It seemed to SCREAMWHAT IS HAPPENING“. To further my point look at the Bell. The clacker is the letter S which to me says SOUTH as for things going SOUTH for a problem! I can imagine the caption standing at the wheel and seeing something scary approaching as he steadied himself against the glass! I loved the total mystery of the image and even today this is one of my favorite images!

1. Moody Sky with moody clouds. ALWAYS A WINNER!

2. STRONG TEXTURES under the wheelhouse roof.

3. Thought Provoking elements, Bell and Hand Print, attention holders.

So,let’s continue our Compositional rules

Rule 3 – Look for image elements that scream “Curiosity”

Rule 4 – Moody, contrasts sky’s are the secret to a power image!

_______________________________________________________________________

SKYS ARE IMPORTANT!

They can be the key to a successful moody image! Look for skies that are full of clouds with texture. Having a bit of blue showing thru the clouds can add a deep emotional hold upon the viewer.

There are a set of VERY important tools to bring out your skies mood depending upon the camera media you use to capture your image!

Your B&W Image Capture Camera Choices :

B&W Digital – Color Digital – Infrared Color Digital – Infrared B&W Digital

For B&W Digital like the Leica Q2Monochrome and the other Monochrome LEICA CAMERAS PLEASE READ THE SECTION BELOW ON PHYSICAL GLASS B&W FILTERS!

For ALL COLOR DIGITAL CAMERAS:

In Post Processing, you can use software color filters to darken the blue sky for DIGITAL Color CAMERAS ONLY.

In Post processing you can use color filters to darken the blue sky. This is an important tool in your arsenal! The various B&W conversion software will allow you to add a digital color filter. Use the Yellow, Orange or red filters to darken the blues of the sky. Orange will also lighten skin tones.

Digital Software Suggestions For B&W Post Processing

Capture 1 for MAC & Windows

Capture 1 for Ipad (M1 or M2 Processors only) I ESPECIALLY LIKE this software product. It is their newest product and it works with every digital camera product that I have! It has the full B&W conversion facility built into it as well. The biggest positive is that an Ipad is small, light and powerful especially for travel! It will save the images on the Ipad if you wish but will also save them to all of the cloud services! I was a beta tester for this software and after being involved in its development I can tell you that it is an AMAZINGLY POWERFUL image processing package!

Photoshop and Lightroom

Nik Filters for MAC & Windows, A MUST for B&W digital post processing!

SNAPSEED (NIK FILTERS) for Ipad, IPhone and Android (all processor types)

_______________________________________________________________________

Shooting B&W FILM

B&W FILM RULES:

Film Rule 1 – Stay AWAY from films that use the C41 or E6 Developers

Film Rule 2 – Go for a ISO range of 100-400 to avoid grain!

Flim Rule 3 – Keep color contrast lens filters on hand. Yellow, Orange and Red. These will increase the contrast of your blue sky. Yellow will also open up textures and lighten skin tones in people and plants a little. USE THEM!! I keep an ORANGE filter on my film lens all the time.

_______________________________________________________________________

Film Suggestions

Use films that use standard B&W processing, NOT C41 or E6. This way you can do your OWN film processing in your kitchen sink with environmentally friendly and save chemistry!

My Favorite B&W FIlms

Ilford HP5 Plus 400 ISO

Ilford FP4 Plus 125 ISO

Fuji Across 100 ISO – has ZERO Reciprocity failure up to 120s

Kodak TMAX 100

_______________________________________________________________________

Pawleys Island Pier, Pre Hurricane, Yes , the end is now gone.

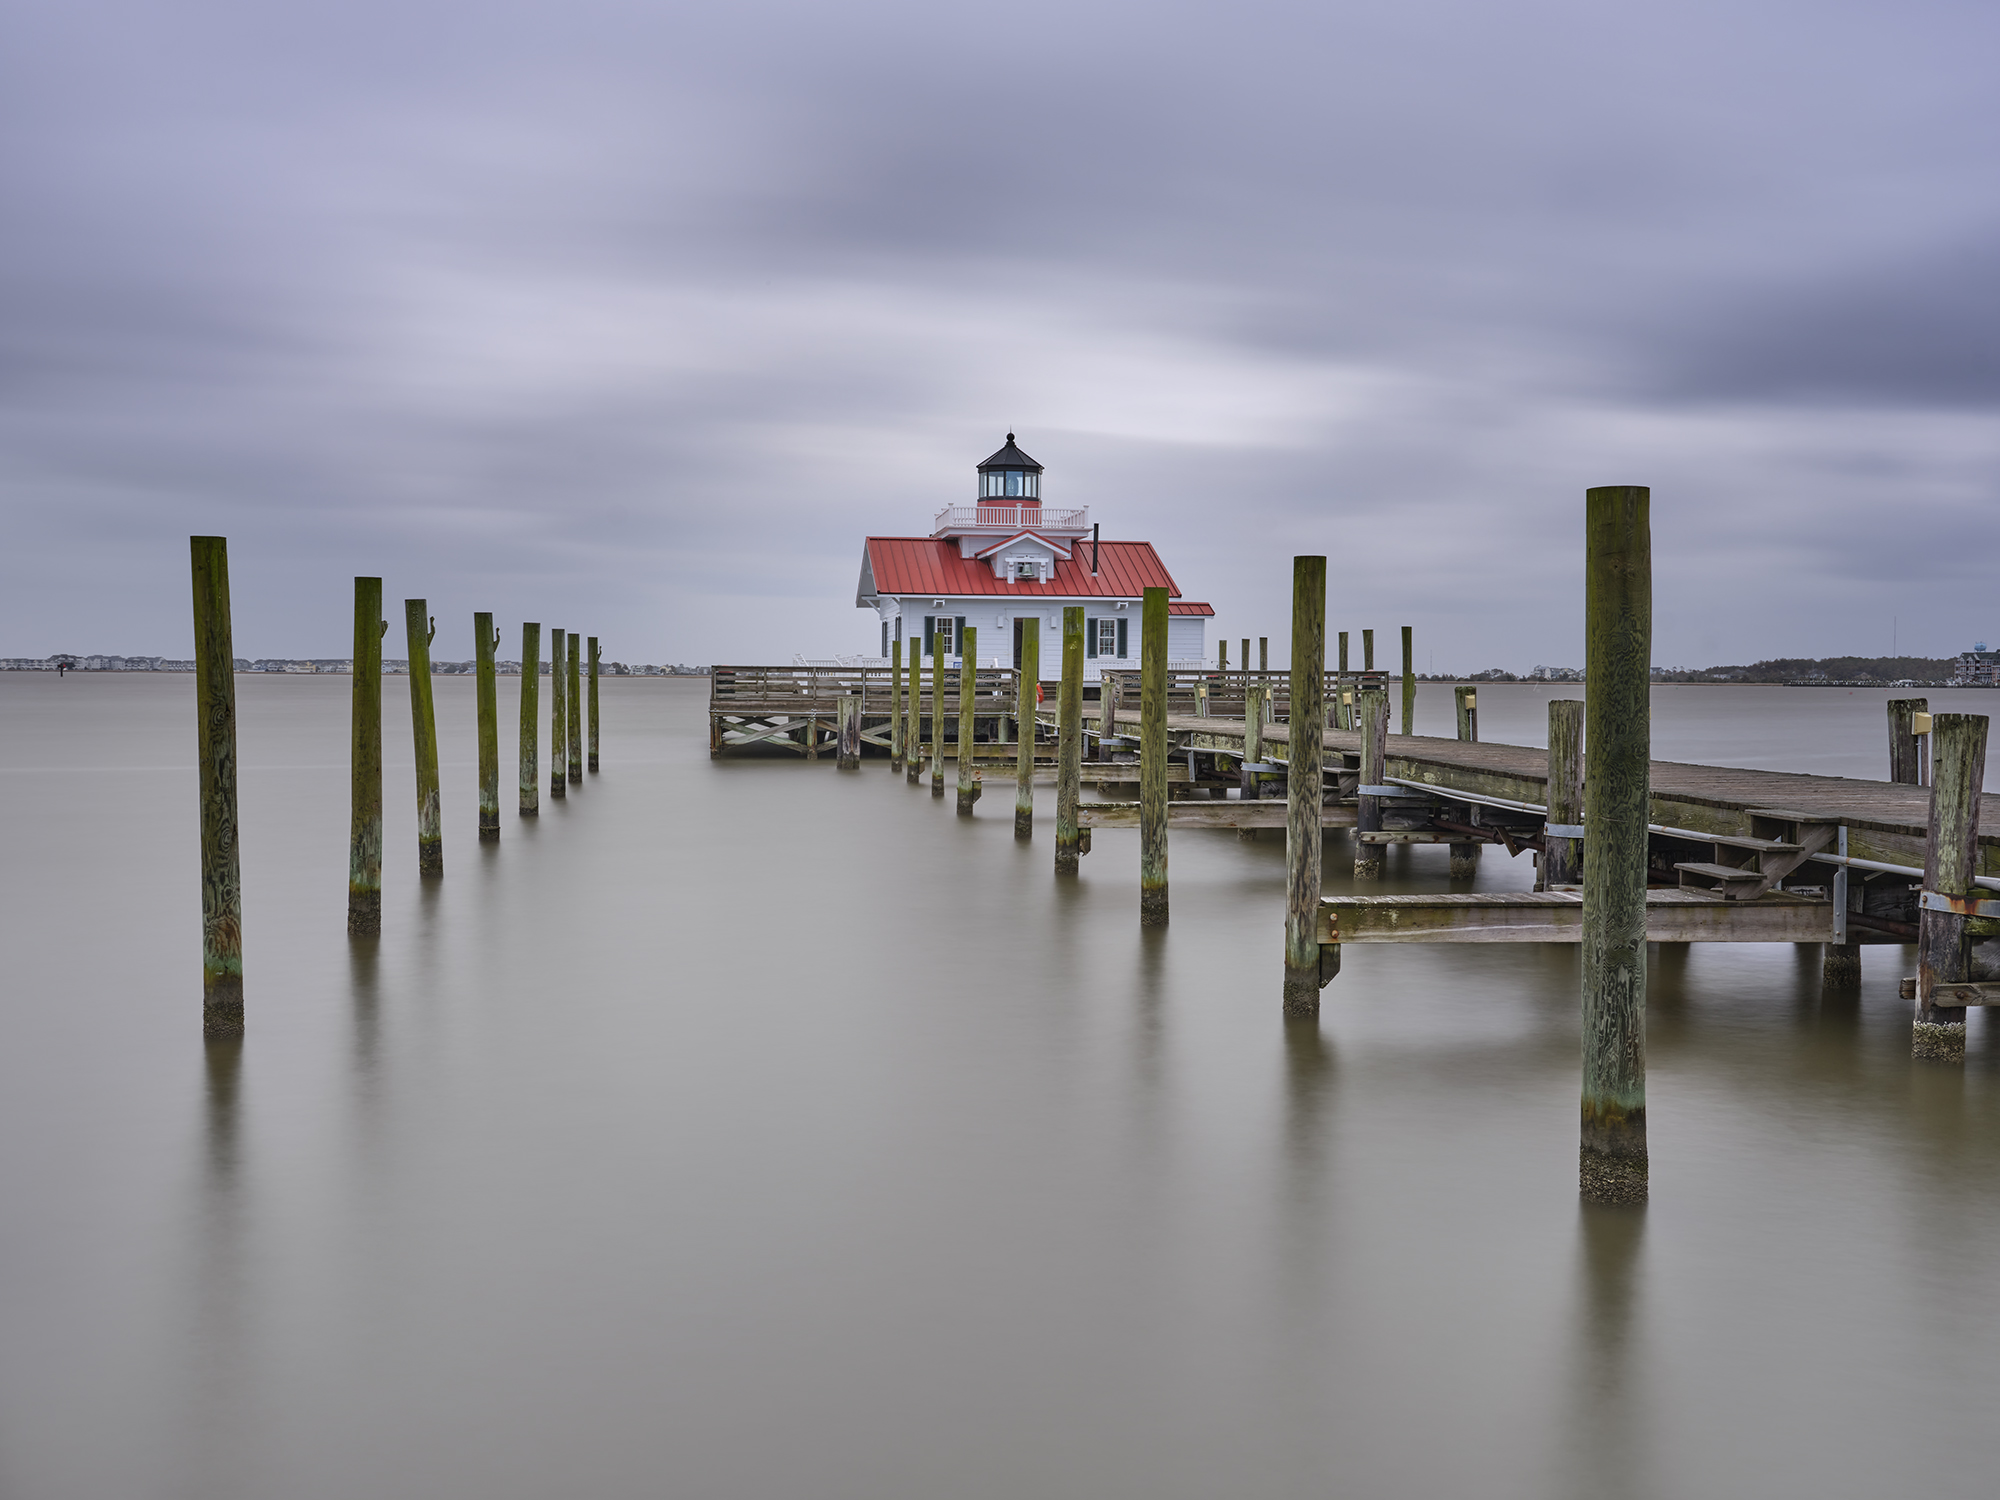
Ok onto one last image. This, like to top image, is a super high key B&W capture. Images like this have a power of their own to stop you in your tracks, grab you by the throat and draw you into the image.

You noticed the very top image of this post. It is another High Key photograph (super bright backgrounds) taken of the Pawleys Marsh in digital. Here you see the Pawleys. Pier (still with the end of the pier) taken on a very foggy morning as a ultra long exposure (I think about 300 seconds on Fuji Across II film.

The most powerful components are the darker groin (breakwater) and pier set against the long exposure smoothing the waves and softening the fog.

What makes this style of image so powerful? It is the contrasts between the darker groin and pier against the stark white contrasting with the smooth surface of the slowed water and the fog of the sky. It becomes almost ghostly and you can easily loose yourself within it.

The key compositional elements in the image:

1. Dark yet almost minimized textures of the pier seems to move forward out to the fog

2. Darker contrast of the groin and its reflection in the ultra smooth surf. This anchors the image in the lower left corner.

3. The ultra bright sky (normally a nuisance and detracting in the image) adds to the ethereal nature of the image

_______________________________________________________________________

Ok, this part of my 4 part series on high impact B&W photography is done. There are a few follow up thoughts that I would like to share with you. Firstly, everything here plus so very much more including advanced post processing instruction will be part of the December workshop here with Jamie and I. There are only a few seats left so please if you are interested do not delay. Here is the link for info:

https://www.newlifephotos.com/photography-workshops/monochrome-photo-workshop/

I will be doing part b of this series next week with a discussion of the darker compositional elements in B&W and start on post processing steps for B&W!

My doggie Skittles says:
When I look at a well designed B&W image I have to protect my eyes from the amazing intensity of the image!

As always please let me know what you thought of this post. I know that it has been a super long time since my last one, but with covid and health issues I simply lost all motivation for most everything but have climbed out of that depression at last!

The Ethereal Nature of Long Exposures Part 1: The Daylight Exposure


A conversation on how to easily create amazing Long Exposures

What is needed to create these ethereal DAYLIGHT images!

Warning, this is going to be a 2 or 3 part tutorial and exceptionally long!

Jekyll Driftwood Beach, 400s

Ahh Peace… I love the ethereal nature of the process in ultra long exposures.  Sitting there behind a good camera exploring a composition, light and movement while waiting in great anticipation of the outcome fills me with such inspiration that I can hardly contain myself!

While these types of images take a large degree of patience and dedication to the art, I have found very few photographers who having never tried them fell fast under their soulful  control! I tell you now that with a bit of basic equipment and easily learned skills that ANYONE with a bit of patience will succeed in this artistic endeavor.   Yes you need some extended functionality in your camera system (most modern DSLR and Mirrorless systems have it!).  Yes you will have to buy a set of “sunglasses” for your camera lens called ND filters (this is where you will find the expense). But believe me this style of photography is SO worth it.

Roanoke Marshes Light, 3 seconds

But how easy is it to create these peaceful images that speak to your soul?  For me the process is quite simple, but I tend to forget that 58 years of experience makes this all easy for me.

So with that in mind I am going to take you through my entire processes and share my equipment lists with the reasons why I chose them and when to use them.


Let’s start out with a quick discussion of what a long exposure actually is:

  • Any shutter speed  longer than 1 second is considered a long exposure.
  • The upper limit is… well, UNLIMITED!  Usually photographers start out at a 30 second exposure in order to get their base exposure locked in, then move up to 2 min or greater.  I typically try to target 8 to 15 min for my final image but have several in the 60 min range also.
  • Typically shorter exposures are needed for falling water in the 10 to 15s range.  If you desire to highlight the swirls in the pool under the falls then much longer times are necessary
  • There are several types of long exposure photography. Here are a few with a bit of discussion about what equipment you need to work them
    • Daylight with the sun up:  This style is most likely the easiest of the LE areas to explore.  Most of your scenes along the beach will have brightness levels of the sky and foreground close enough to fit within the dynamic range of your camera and only need solid ND filters.
    • Sunrise/Sunset:  This style of LE work is more difficult as the sun nears the horizon during Sunset and as it gets close but not over at sunrise.  Lighting conditions are way more difficult and still require solid ND filters but will additionally require 2 specialized filters, a 3 or 4 stop soft edge graduated square filter and a reverse graduated square filter.  The light intensity around the horizon will make these image impossible without the graduated filters (more on this in the 2nd post)
    • Night Long exposures: Milky Way, Star Trails and others.  This is a specialized pursuit that requires different lenses and filters and will be saved for another day.

Camera Features and settings needed

Any DSLR or Mirrorless camera (I use a Fuji GFX 100 medium format digital). You will want the following features and settings:

  • Aperture mode to determine base exposure
  • Long exposure noise reduction set to automatic.
    • Photographers new to long exposures might want to turn this setting off.  Here is why:  When you create a long exposure image, say 30 seconds long this is what happens with LE Noise reduction turned on or automatic.
      1. The camera fires and takes a 30 second exposure
      2. The shutter closes
      3. The camera keeps the shutter closed and takes a second 30 second exposure in the dark between the shutter and sensor.  This is called a Dark Frame Exposure
      4. The camera then combines the 2 images and subtracts the noise

While 30+30=60 seconds does not sound like too much of a wait, if you are in the learning process and going thru the trial and error mode that 30 seconds turns into 1 min, a 2 min exposure turns into a 4 min, 4 to 8, 8 to 15 and so on it goes.  This takes a lot of time especially at sunrise/sunset when the light is rapidly changing!

TIP: YES you want the LE noise reduction turned on to get the best and highest quality that the camera can provide, but when learning and making exposure mistakes while calculating ND filter offsets for the shutter these long times degrade your learning curve.  So turn it off until you get used to all of this then when comfortable with LE work turn it on AUTOMATIC and leave it there.  It will only affect exposures over a certain time which is dependent upon your camera.  My GFX 100 turns on at 15 seconds, others at 30 and so on.

  • Pixel Remote for all cameras

    RAW capture mode turned on

  • Color space set to Adobe RGB
  • Manual mode with a BULB  or TIME setting
    • Bulb is where the shutter is open as long as the remote shutter release is active
    • Time mode is where you can set exposure times in full stops usually out to 30 or 60 min.  With this mode you do not need a timer or a remote shutter release, you set the time fire the camera and sit back.
  • Remote shutter attachment with a timer display built into it with cable for your camera. This works wired or wireless. I suggest this one HERE
  • VERY sturdy tripod that you can spread the legs out wide and low. Good tripods are very expensive but can last for you entire life.  Look to Really Right Stuff for the best.
  • A small 3 leg photography stool (Amazon) to sit on and BE STILL. See it HERE
  • A small red headband flashlight. Turn it OFF hen not needed!

Camera Lens

  • Lens, a wide zoom.  95% of the time I use a 32-64mm f/4 lens (35mm equivalent of 23-58mm) on my GFX 100 for my long exposures.  On rare occasions I have a GF 100-200mm when I desire a detail shot of a waterfall, and a GF 17mm for those times that demand a very wide view.
  • Most of my students use a 24-105mm f/4 that will cover most all of the scenes you will run across.
  • You do NOT want a fast f/2.8 lens for long exposures.  By adding the extra fast 2.8 setting you loose a more closed down setting like f/22 or larger which will be useful for getting the long shutter times with less ND.

Filters needed for long exposures:

Filters you say???  But WHY?

Well the simple answer is that in order to do long exposures you need to have long shutter times!  The filters we use are called ND or Neutral Density filters. They come in several types and styles and they act as sunglasses cutting the light down going into your camera forcing it to longer shutter times to compensate!

Yes, I am afraid that they do cost a bit of money, but purchase the best you can afford, you will not be sorry!

Filters companies are a subject full of differing opinions, many good and many with issues so I will discuss my personal  filter decisions and why I choose as I did!

I have been through several companies filters over the years and have used the following.

  • B+W.   Good filters, a bit expensive and limited to round screw on only.  They change the white balance of your camera to a brownish tint… They come in all of the standard values and even offer a rare graduated screw on that places the start in the middle of the frame.
  • Lee.  Again, Good filters, very expensive and made of plastic that are very easy to scratch with one or two in glass.  They change the white balance to a blue cast.  Lee offers ALL of the filters you could possibly need for any type or style of long exposure work
  • Singh Ray filters.  Intolerably expensive. They come as screw on and several sizes of square/rectangle styles.
  • Breakthrough Photography X4 filters.  These are simply the best filters that I have ever used! They are all hardened optical schott glass, ZERO color cast and have an unconditional 25 year warranty!  They come in all types and styles, (more on this later) and mount options:
    • Screw on
    • Magnetic
    • 100mm and 150mm squares/rectangles


BASIC DAYLIGHT ND Filter suggestions for after the sun is up higher in the sky or 1/2 to 1 hour before sunrise!

  1. 3 stop solid ND, sized to your camera lens or a square/rectangle system 
  2. 6 stop solid ND, sized to your camera lens or a square/rectangle system 
  3. 10 stop solid ND, sized to your camera lens or a square/rectangle system 
  4. 15 stop solid ND, sized to your camera lens or a square/rectangle system 

TIP I find that I use the 6 stop, 10 stop and 15 stop most of the time

Breakthrough 3 stop ND

For normal daytime exposures the sky and foreground (especially the ocean) usually have the same tonal range.  For this type work just a solid ND set is needed.  Solids are the same dark density across the entire glass.  Take a look at the 2 images below.  Notice how the sky and foreground are at the same basic brightness value?

The TOP post image is also another example that is right on the edge of needing another type of filter!

Pawleys Marsh, 30 seconds. B+W 10 (110) stop solid filter

Since the difference between the TOP and BOTTOM of the image falls within the dynamic range of my camera only a 10 stop SOLID ND filter was required!  Exposures like this only need a solid ND filter! For this image I used a B+W 110 (10 stop solid) and fixed the white balance in the RAW conversion.

TIPDo NOT worry about aperture diffraction on long exposures.  Remember that we are AVERAGING and the diffraction errors go away.  Use the complete range of your aperture to get the shutter speed you desire!

For color work the rule is the same, as long as the upper half and the bottom half of the image falls within the dynamic range of your camera a solid is all that you need! The Roanoke Marshes Light below is an example for you.

TIP: People moving on a dock you are shooting?  DO NOT WORRY!  On a long exposure with people walking in the scene they will disappear unless they stand still more than 1/4 of the exposure!  The image below had 4 people walking down and back on the dock!

Roanoke Marshes Light, 40 second exposure single 10 stop solid Breakthrough X4 ND.


The  MOST IMPORTANT Lesson!

Ok, here it is:  The HARDEST part of a long exposure image is learning to calculate the exposure values necessary to get the softness/tearing that you desire.  Actually this is very simple and below you will find the steps to easily do this!   I am going to show you 2 ways to do this.  The first and most important way requires to you multiply/divide a simple number by 2 which is ONE STOP either for the shutter speed or the aperture! But first, we need to understand what a full Stop means for shutter speed and aperture!

Understanding Full Stop Shutter and Aperture Relationships

Shutter Speed Example Full stop Changes:

Shutter Speed Values

  • 1/60s to 1/30s
  • 1/30s to 1/15s
  • 1/15s to 1/8s
  • 1/8s to 1/4s
  • 1/4s to 1/2s
  • 1/2s to 1s
  • 1s to 2s
  • 2s to 4s
  • 4s to 8s and so on.

Full stop changes to your shutter speed is simple dividing or multiplying by 2

Being off by a small amount will make no difference as the shutter speed gets longer.

Aperture: aperture values cannot be calculated like shutter speeds.  Aperture is logarithmic and the math is difficult to an extreme.  Todays aperture values on almost all of the digital bodies are usually in 1/3 stop values!  Below you will see the FULL stop values that we want to use for ease of calculation.

FULL STOP Aperture values


Exposure Calculation Version 1

Discussion on using FULL STOP Aperture and Shutter Values to calculate exposure offset for various ND filters


  • START: Set the camera ISO value to the lowest native value that the camera supports.  This is usually 100 or 200.  Some cameras will go down to 50 or 64.  Also, most cameras have a LOW ISO setting, DO NOT USE THIS SETTING because the camera artificially gets it lower by decreasing the Dynamic Range of the camera which decreases the quality of your image!
  • Start by taking a picture in the Aperture priority mode with the aperture set to f/8 to get a base exposure that was good in camera with no ND and say that it metered at f/8 and 1/60s
  1. If your lens goes up to f/22 then we could change 3 stops on the aperture with no ND installed from f/8 to f/11 to f/16 to f/22 which will cause an under exposure of 3 stops that we bring back into the perfect exposure by decreasing the shutter speed by 3 stops or 1/60 to 1/30 to 1/15 to 1/8 seconds.  Still not long enough for the purpose of smoothing water so now we add a ND filter
  2. Putting a 3 stop ND on your lens would again under expose by 3 full stops which we counter by decreasing the shutter speed 3 more stops from 1/8 to 1/4 to 1/2 to 1 second.  Again really not long enough but we are getting there!
  3. So how about replacing the 3 stop ND with a 6 stop ND?  This will give us 3 more stops taking us from 1 second to 2 seconds to 4 seconds to 8 seconds!  Now we are getting somewhere!
  4. For a longer yet shutter speed we could replace the 6 stop ND with a 10 stop ND! This gives us 4 more stops of under exposure that we compensate by making the shutter speed longer by 4 stops!  So 8 seconds go to 16 seconds to 32 seconds to 64 seconds to 2 min (now round to the  whole min because 8 seconds difference from 128 seconds to 120 seconds will make no difference)
  5. Not long enough?  Let’s replace the 10 stop ND with a 15 stop ND!  This gives us 5 more stops of under exposure from the 10 stop ND. We compensate by adding 5 more full stops of shutter speed going from 120 seconds or 2 min to 4 min to 8 min to 16 min to 32 min to 64 min.
  6. If this is too long you can now open the aperture 2 stops which will allow you to shorten the shutter speed of 16 min or 3 stops to 8 min!

Do you see the relationship between full stop changes in aperture and shutter speed?

This is all you need to do!


Exposure Calculation Version 2

There is a FREE long exposure calculator for your smart phone called:   LEE STOPPER. You will need to download and install this  app to use this technique!

How to determine your exposure:

  1. Set the camera ISO value to the lowest native value that the camera supports.  This is usually 100 or 200.  Some cameras will go down to 50 or 64.  Also, most cameras have a LOW ISO setting, DO NOT USE THIS SETTING because the camera artificially gets it lower by decreasing the Dynamic Range of the camera which decreases the quality of your image!
  2. Take a picture in the A (aperture priority) mode with the aperture set to f/8
  3. Read the exposure data from the back of your camera and note the shutter speed the camera used!
  4. Set the camera mode to M (manual) mode
  5. Open the Lee Stopper app on your phone
  6. Choose which of the 3 ND values you would like to use in the app, 6, 10 or 15 stops
  7. Enter the shutter speed into the app by turning the white wheel (see below)
  8. Read the new shutter speed from the blue wheel for the chosen ND filter
  9. If the desired shutter speed is less than 30 seconds enter it into the camera with the shutter speed wheel on the camera
  10. If the desired shutter speed is more than 30 seconds then move the shutter speed wheel on the camera to B or BULB
  11. Connect the remote shutter release cable.  If it has a timer on it like the suggested one above then put it into the BULB mode and press the button to fire the camera.  Watch the timer on the shutter release and when you get to the correct time press the button again to stop the exposure.
  12. Remember if you have the long exposure noise reduction on in the camera the camera will now take another exposure with the shutter closed for the same time as the step above.  When this is finished you can view the results on the camera and if not to your liking adjust the shutter time up or down or change the aperture up or down to adjust to your liking and re-shoot.
  13. If you do NOT have a remote shutter release with a built in timer you can select the stop watch button on the bottom of the Lee app (look at the pic below) and it will automatically move your shutter speed to a stop watch in the app.  Press and lock the remote shutter release and press the start button on the stop watch screen of the app.  When finished, the app will alarm you to stop the exposure.

TIP: for values between full stops (those shown in the app) you can partially move the wheel to the small ticks between the full stops to offset the exposure for partial stops.

Enter Base exposure and read new ND exposure


Stop watch timer in the Lee app


This is all there is to calculation version 2!


Subject considerations

Seascapes:

Clam Creek Pier Jekyll Island, 2 min exposure, 10 stop Breakthrough X4 ND

The ocean surf can give you some of the most amazing images!  The waves are AVERAGED during the long exposure so that one builds on another each averaging the wave before it until you get a perfectly flat reflective surface! Notice the great reflections that you can get because of the averaging!

Shot Setup: To create this shot above I set the tripod on on some rocks along the waters edge.  I looked for a composition where the pier came in from one side to the  T where I could smooth out the water and get a good reflection. I also made sure that there were no ships passing by. Then did a base exposure test of 30s  and used an aperture of f/8 .  at 1/8s.  I then added a 10 stop solid ND and adjusted my shutter speed from 1/8s to 1/4s to 1/2s to 1s to 2s to 4 then 8 then 16 then 32 then 64 then 120 (2 min)

photography stool

TIP: Sand is your enemy!  It is full of water and when someone walks by (within 4 feet) the pressure of their feet pushes the water away from their shoes causing the sand to rise around  your tripod legs!  You might think that this is minor but it will ruin exposures from 2 min and longer!   STAND STILL!  ASK PEOPLE TO WALK FURTHER AWAY FROM YOUR SETUP!  Take a small 3 leg photography stool and SIT DOWN and NOT MOVE! See HERE

Long Exposure Example

Nags Head Pier in Fog/high surf/high wind, 15 min exposure, 15 stops Breakthrough X4 ND

Screw

For really large waves and/or fog you tend to get a more etherial look that is really pleasing!   This image was a difficult one to capture due to the large surf, fog and high winds.

Shot Setup: For the above shot took serious thought.  With gale force winds from right to left, the Surf was about 12 feet high filling the air with salt spray and since this was a workshop there were 14 people moving about on the sand.  I took my tripod and splayed the legs way out to the sides and shortened them to put me almost on the ground.  I then sat between the camera and the wind.  I also took off the shoulder strap so that it would not catch the wind. Lastly I set up the remote shutter release in wireless mode so that even that wire would not catch the wind.   The surf was so high that nothing less than 15 min would give me the look I wanted with pure white water and the fog.  Even though there was heavy fog, please notice that the pier is angling down as it goes out. The white a the end is a combination of the fog and the ultra high waves hitting the under side of the pier!  This shot was a 15 min exposure at f/32 using a 15 stop Breakthrough X4 solid ND.

TIP: Wind is your enemy and hard to overcome.  Splay your tripod legs wide and drop the tripod as close to the ground as you can.  Sit between the wind and the camera to block it as best you can.    You can put weights under the center post and if on sand buy a dog chain screw that you turn into the sand. Attach a truck tie down strap from the tripod to the screw and tighten it down further reducing movement. Find it HERE

Nags Head Pier, 15 min exposure, 15 stops of Breakthrough X4 ND

Shot Setup: Another image (but different) of the Nags Head Pier.  This scene had a 6 foot surf and hardly any real wind.  As I studied the scene I realized that the faint clouds in the sky were moving away at an angle and I wanted them to be a major part of the composition along with totally smooth water surface. I setup the tripod with the legs splayed out wide and low to the ground for greater support and wind control.  I did not have a lot of time to work this so I started with a 2 min base exposure and then calculated it for a 15 stop X4 ND and took one shot.  Total time for this single shot was a 10 min setup with a 4 min base shot (with LE noise reduction on), then the 30 min shot, 15 exposure and 15 dark frame. There were a lot of people moving up and down the pier who simply were not captured in the averaged exposure.   I am very pleased with the results.

TIP: Surf and sand is your enemy. With your tripod feet on the sand should a small wave washes over one the tripod will TILT or SINK! If this happens stop the exposure because it is ruined, move your setup higher up the sand and setup again and re-shoot!

For longer exposures in the 4 to 15 min range aside from the wave averaging you can also average the movement of the clouds! Do you see how the are streaming away from us?

TIP: Surf is your enemy. Keep your camera bag behind you higher in the sand!

Brunswick GA. Bridge, 15 seconds, 10 stops of Breakthrough X4 ND.

Shot Setup: For this shot above I was at the bridge leading into Brunswick GA.  There was an old bridge this that had been cut off and turned into fishing pier.  It was super stable and there was no wind.  This was supposed to be a sunset shot but the bridge kept calling to me.  So, listening to my inner voice I decided to shoot this in the vertical format and concentrate on color on the side of the bridge, its lights which I wanted to generate star bursts on. The color in the sky was amazing and with the clouds moving sideways I knew it would make a great image.  I chose a 10 stop X4 ND.  I took 2 or 3 images in this location and liked this the best!

Another advantage of the cloud tearing, water smoothing effect of the longer exposures is the starburst around any bright light in the scene caused by having a very small aperture f/11 to f/22.  I think that it adds an amazing compositional image!

TIPTo capture a sharp star pattern on bright lights in your composition  use a small aperture!


Duck Island NC Pier, 8 min exposure, 15 stop Breakthrough X4 ND

Shot Setup: This image above was on the boardwalk on Duck Island in the Outer Banks.  The water here was green with white caps.  Nothing remarkable.  The pier on the other hand was stunning with its colors, textures and form! The sky was very overcast and with no form or structure but I thought that a long exposure would pull out a bit of shape.  The boardwalk  was very stable so I did not have to worry about vibrations.  I setup carefully to directly center the pier in the frame.  My focus point was 1/3 down the pier as I wanted detail in the rope.  I set the aperture to f/32 for the greatest depth of field. I did one base exposure at 1 min and then calculated the exposure for 8 min.  This is the single image I took here. I find it very pleasing and ethereal!

TIPBirds flying through the scene on a long exposure will disappear from the scene due to the averaging of the exposure!


As I said above this introductory tutorial is set up to be presented in 2 or 3 separate posts.  Look for Part 2 Sunrise/Sunset Long Exposures and the special filters needed in about 2 weeks!

This is the next type of long exposures we will learn about creating in post #2!


Nags Head Pier Right At Sunrise! 15 min exposure with 3 different ND filter types installed!

As always please let me know what you think of this!


CLiR Infrared Post Processing Photoshop Panel, 1st New IR Software In Years!


The New CLiR Infrared Processing System and Photoshop panel!


CLiR Aerochrome Processed


Working with the new CLiR Infrared Post Processing Panel in PS using my standard test image of the Covered Bridge!
 
This was shot on a XPro1 converted by Kolari to 720nm
 
I have to tell you that the power of these editing tools are beyond amazing! They are easy for beginners and the advanced functions are awesome!
 
Will be teaching the CLiR process in all of my workshops with Jamie Konarski Davidson as well as in the NECCC Photography Conference in July!
 
These 3 images edited in CLiR took me about 15 min to complete all three, one in my normal fashion, one emulating Aerochrome (TOP) and another normal but textured! You folks are going to love using this software.

CLiR My Normal Processing

 
I have a 20% discount code hilliard20 that will give you a 20% discount or you can direct order with it applied at:
 
 
For the NECCC conference I will have a slightly larger discount code for my Infrared Sessions!

CLiR Normal Processing with Texture overlay

 
If you are interested in the new IR Chrome filter with my discount you can purchase it from Kolari at:
Had you heard of this new IR system?   It has been a LONG time since new IR editing software has come out to the market.  I am still exploring the capabilities of this package but I am super impressed.  It does not matter if you are new or experienced in post processing IR images you will quickly learn to navigate the panel.  This is possible due to the great video tutorials that come with the panel!

Let me know your thoughts on this when you have tried it or watched their online intro video!

Presenting at the NECCC Photography Conference


I will be presenting at this years NECCC Photographic Conference  from July 12 to the 14 at the University of Massachusetts.  Please consider attending if you are in the area!

I have posted a short video on what the session will be covering that my dog and I made today (she says to watch it to the very end)!

Here is a link to NECCC: http://necccphotoconference.org/
 
Here is a link to Kolari :http://www.kolarivision.com
 
Here is a link to CLiR: https://f64elite.com/hilliard20


Creating Etherial Long Exposures With Breakthrough Photography’s X4 ND Filters


The  Peace Of The Creative…

Slowing down creates peace on multiple levels. 

For you as the photographer and for those who view your work, this has never been more true!

Roanoke Marshes Light. Fuji GFX 50R for 20 seconds with a Breakthrough X4 6 stop ND and the X4 2 stop soft graduated ND

I am going to do a slightly different type of post this time. 

We will discuss the art of Long Exposures a bit but we will focus more on the technical aspects of using ND filters to correct for different types of lighting as well as talk about good ND filter systems verses not so good, and why it is always best to invest your money in good filters!

DefinitionLong Exposure – To create an image in camera with the shutter open for longer than a few seconds in order to smooth out movement over timeThis can be softening the  flow of water over a waterfall, flattening of waves in lakes and oceans or tearing clouds moving across the sky.

Setup:  For camera setup you want a long shutter speed (for me usually from 20 seconds to 60 min), mid range aperture (f/16)  and the base ISO that your camera provides.  You do NOT want to switch on the L ISO in your camera. While it  forces the ISO lower it costs you in reduced dynamic range! You should also verify that your camera has Long Exposure Noise Reduction turned on.  This is a royal pain due to doubling of exposure time and forcing you to wait twice as long for a shot but it removes sensor generated noise as well as sensor hot spots.

Note:  I have added a video to the bottom.  It discusses everything and more that we are talking about in this post but it is quite long!


The top image was taken at the always inspiring Roanoke Marshes Lighthouse across the sound from Nags Head Island in NC. As one of my favorite locations for sunrises over the lighthouse it is also a most worthy location for daytime long exposures! These are usually very easy to create due to the small waves in the sound! This image was done on a Fuji GFX 50R medium format digital with a 32-64mm GF lens, 6 stops of ND (Breakthrough X4 magnetic) and a X4 2 stop soft graduated ND on the sky to balance the difference between the sky and water. The exposure was 20 seconds an hour after sunrise and in the rain.

But by what criteria did I choose the solid ND and the soft edge graduated ND?  This is where a little technical knowledge will really help you in creation of amazing long exposures.

First, there are a few points to consider when thinking about using ND filters:

  • ND filters are simply sunglasses that you put in front of your lens to limit the amount of light that reaches the camera.
  • There are 2 basic styles of ND, Full and Graduated.  Full covers and darkens light passing through the  entire lens, Graduated cover and darken only part of the light passing through the lens with the ability to rotate the edge angle of the start line and moving the line up or down in the scene.
  • In the full family there are several values and styles.Breakthrough Magnetic lens mount with the rotating dial on the back to rotate the filter
    • Screw on:  they simply screw onto the end of your lens
    • Magnetic:  these are a new (2018) system from Breakthrough Photography.  They require you to buy a special magnetic mount bracket for the filter threads on your lens.  The adapter has a rotating ring that allows the filters to be actually turned (for use with polarizers) and costs about $20. Currently, Breakthrough is re-designing both the magnetic filters and the magnetic lens adapters to allow for stacked magnetic filters.  This should be completed by summer 2019 and they will replace the older style magnetic filters and adapters. It is important to tell you that when you use the magnetic filter system alone or with the square system there is NO vignetting.
    • Breakthrough Square holder that attaches to the magnetic adapter
    • Square:  these use a square holder and in the case of the Breakthrough this holder will attach directly to the magnetic holder allowing use of and stacking of both systems at once. The square holder will hold 3 to 5 filters depending upon how you initially set it up. This is good for difficult lighting situations where you might need two different graduated filters at the same time.  This style  tends to suffer from light leaks around the edges of the square solid ND filters unless you carefully assure  that they are installed exactly right and only in the holder slot closest to the lens.
  • In the graduated family there are several types:Breakthrough Photography X4 soft Graduated 100mm filter system
    • Hard edge graduated:  where the dark area of the graduated filter is a sharp line.  This is for use on subjects which have a harsh division between the foreground and background . An example would be shooting on the ocean where the horizon is a sharp line between the horizon and the sky.  This is where you would choose a hard edge graduated ND.  These filters usually come in 1, 2 and 3 stop values where they start light and graduate to the dark.
    • Breakthrough reverse grad
    • Soft edge graduated: where the dark edge of the graduated filter starts very soft and  light and darkens as it moves up the filter.  This is for use in areas that you need to balance the foreground from the background but there is no clearly defined edge in the scene.  This is what I used in the image above to darken the sky so there was detail there and still enable the water foreground to be bright and almost a platinum look and feel.  These filters usually come in 1, 2 and 3 stop values where they start light and graduate to the dark.
    • REVERSE graduated:  this is a special graduated ND where it starts DARK and graduates up to lighter values.  If you desire to shoot sunrise/sunset this is a MUST have filter because as the sun approaches the horizon you get a very bright line of colors there that will either be blown out or if exposed correctly cause the rest of the image to be way too dark!  These filters usually come in 1, 2 and 3 stop values where they start dark and graduate to the light.
Breakthrough Photography Magnetic filter system.

So for the Roanoke Marshes Light above, I chose a Breakthrough magnetic X4 (newest technology) 6 stop solid nd to darken the entire image allowing for the 20 second exposure with the camera set to the lowest native ISO value (100),  an aperture of f/16 and a shutter speed of 20 seconds.  the initial results of this exposure was pleasing water in the foreground but the sky was also too light with little to no detail.  So I left the 6 stop magnetic filter on the lens and clipped on the 100mm square filter adapter onto the end of the magnetic adapter and installed a X4 soft edge 2 stop SOFT graduated ND filter.  While watching thru the viewfinder I adjusted the graduated ND up and down making sure that the soft edge came down to the horizon or a little above darkening the sky to allow for more detail there yet allowing the soft white water in the foreground!  It was as simple as that!  The entire process after the first shot took about 30 seconds to setup on the camera lens then shoot!


So let’s talk about sunrise/sunset images when the sun is close to the horizon.  We have all been out at sunrise, do you remember the very bright band of intense color that it right at the horizon as the sun approaches?   This is why the reverse grad ND filter was created, to keep the bright colors from destroying the overall exposure!  Here is an example image, amazingly at the same spot!

Roanoke Marshes Light, 3 seconds with the Breakthrough reverse grad placed on the horizon
Breakthrough X4 reverse grad.  See how you might place the dark area on the bright line at the horizon?

Do you see how bright the light is at the horizon?  The ONLY WAY I was able to capture this image was to use the reverse grad ND placing the dark section right on the bright band of light. Because the overall exposure was only 3 seconds no other ND filters were required.  Should I have desired a longer exposure to further soften the water’s surface I would have dropped in the 3 or 6 stop X4 magnetic filter into the adapter already on the camera!

Let’s take a short side trip here and discuss the actual filters.  By now you all have seen that I am a strong user and promoter of the Breakthrough Photography X4 line of magnetic and graduated filters.  There is a reason for that:

  • All dark solid ND filters suffer from some sort of light leaks around the slide in filter holder.  The magnetic mounted X4 Breakthrough filter line has solved this problem.
  • The X4 Breakthrough filters have ZERO COLOR CAST!  This is a really big deal.  I have been a big user of B+W and Lee filters over the years and still have them on hand.  Unfortunately, both of those both have strong color casts that force me deeper into post processing to attempt to correct these color casts.  I had always thought that this was simply the cost of doing long exposure!  Well NO MORE!   I am so pleased to report that those problems are not the case with Breakthrough, ALL BREAKTHROUGH filters!  Cost wise they all cost about the same when you get up into the same quality levels (B+W, Lee, SinghRay and Breakthrough).  So for me it was an easy choice, I have totally converted over to the Breakthrough X4 line of filters. I currently am using the magnetic and square system from them.
  • There is ZERO vignetting with the magnetic system on ANY of my lenses.  I currently and using 72mm, 77mm and 82mm lenses and mounting both the magnetic system and the 100mm system together!
  • Breakthrough filters come with a 25 year guarantee and their customer service is crazy good.  They are currently (Feb 2019) working on an updated magnetic system where the filters can be stacked in the holder!


So my advice is this.  Cameras come and go, it is your glass (lenses and filters) where your quality lays.  Invest in the best you can.  You will never go wrong with the Breakthrough system!  (gee I wish they would pay me…)

Ok, back to images.  After sunrise is done and before sunset is anywhere near we can still create AMAZING long exposures!  There only 2 problems that we must overcome!

  1. Slowing down the shutter speed to give the long exposure.  During normal daylight we will likely be using a 10 or 15 stop solid magnetic X4 ND as long as the sky and the foreground are near the same exposure value.
  2. Should the sky be brighter than the foreground we will also use a X4 soft edge graduated ND filter to balance the foreground and sky.
Pawleys Island Pier in dense fog. The foreground and sky are close to the same brightness so I only needed a 15 stop X4 magnetic filter

Here is an example of a scene with little difference between the sky and the foreground. The waves were HUGE this day so I used a X4 14 stop magnetic filter so smooth them down (490 seconds) and give the feel I desired.  The fog in the sky took care of itself and I walked away with a balanced ethereal image that I just loved creating! Another example of this is shown in the image below.  This again was a super foggy day so the need for detail in the fog was unnecessary so the oly ND needed was again the X4 15 stop magnetic filter!

Nags Head Pier in super dense fog.  X4 15 stop solid magnetic filter for 10 min


Ok, let’s take a look at a problem image where the sky has detail that you can see but when you only use a solid nd the sky is totally blown out!  What you simply need is a X4 Soft Grad filter to balance the sky and water to give you a bit of detail in the sky!

Duck, NC boardwalk and Tdock (broken) with a X4 6 stop magnetic filter plus a X4 2 stop soft grad ND on the sky down to the horizon.

These last two images show a extreme case of no balance between the water and the sky and more nd was needed on the sky to correct the imbalance.


P

Pier, Outer Banks, 12 min exposure, 15 stop X4 magnetic filter and a 3 stop X4 soft graduated filter down to the horizon.  The sun was up to the right and lighting the bottom side of the clouds.

Ok, one last thing… I had a live group hangout last night with some of my online students and we discussed everything in this post but with more info and thoughts on choosing the correct ND filters for a number of scenes.   Here is the link:

https://youtu.be/_qFkUJZzXmw

I know that this has been a long post but it was necessary to show the technical side of creating pleasing long exposures.    Next time I will discuss how to meter for long exposures.

As always please let me know what you think!


Learn the art of long exposure at our Georgia Coast Photo Workshop!


Georgia Coast Photo Workshop

March 7 – 10, 2019

Boneyard on Jekyll Island at sunrise

I LOVE working with long exposures…

There is so much peace in the long exposure process. At the scene, behind the camera and the results after processing simply takes my breath away. It does not matter what you decide to shoot with, Color, B&W, IR or Film because It simply does not matter, It all works. The processes of working with LE is that as we slow down the shutter of the camera we too are forced to slow down our mental process and be drawn into the scene! This works for boneyard shots at the beach, moving clouds over a building or simple rocks in the surf, It is an amazing journey in one single shot!

THE AMAZING IS POSSIBLE!

That is the thing about coastal Georgia. there are so many amazing photographic opportunities. Aside from the biggies, You all know how I love working in film and wabi/sabi, but creating long exposures is the one single photographic technique for me that always brings me peace…

This is your chance to learn the process, from artistic vision, choosing the correct filters and camera settings to post processing! Come along and learn all of these and more with Jamie and I. You will not be disappointed.

What exactly is needed in terms of equipment?

There are some equipment requirements for long exposures and as you find your self drawn into the process you will likely expand your catalog of gear, especially filters!

  • Good steady tripod.
  • Remote shutter release (wireless allows you to move around while working)
  • Fresh full battery.
  • Camera that allows a T or B mode
  • Low ISO capability
  • A basic set of screw on solid ND filters.  These will work during the day time when the sky and foreground are the same brightness level.  For times around sunrise/sunset you will need to add  2 basic graduated filters as well. ND filters are like sunglasses for your camera that come in different densities (darkness values).

My solid set includes: 

  1. 3 Stop X4 solid magnetic Breakthrough
  2. 6 Stop X4 solid magnetic Breakthrough
  3. 15 Stop X4 solid magnetic Breakthrough
  4. Polarizer X4 filter magnetic Breakthrough
  5. Night Sky X4 filter magnetic Breakthrough


My square (75mm and 100mm) set includes:

  1. 10 Stop 100mm X4 solid Breakthrough 2.5 Stop 100mm  soft edge graduated Lee
  2. 3 Stop 100mm X4 Reverse graduated Breakthrough
  3. 2 Stop 100mm X4 Soft Graduated Breakthrough

There are many makers of ND filters, I have always gone with B+W  and Lee but the Breakthrough  are much higher quality with a much higher cost. Because I have recently added a Fuji Medium Format digital system I am building a set of the Breakthrough filters in both solid and graduated using both their new magnetic system and the 100mm square filters for the graduated.

To start, you do NOT need all of these and the basic set will allow you to get started but you will run into trouble as the sun approaches the horizon on sunrise/sunset.

Learning how to use all of these filters is not difficult but you will be miles ahead of everyone if you consider a workshop that covers all of it PLUS the art of post processing your long exposures after capture.  The Georgia Coast is a great place to do just this.  We will be out all day learning behind the camera as Jamie and I wander around with you helping along the way, sharing our secrets for in camera, as well as the art of post processing in evening classes at the hotel!  This is a great workshop to learn the technique of long exposure but not limited to that!  We will spend time at a lighthouse, a old broken down building, piers, beaches and of course AMAZING SHRIMP BOATS!

Another view of the boneyard after sunrise!

You can download a PDF info link here:

https://app.box.com/s/qcw6ekysxgbe8tm8hb1l7a6nfytinly0

Using B&W To Grab Your Viewers By The Throat…


Yes, deep moody B&W can capture and hold your attention!

Pawleys Island Marsh, North Causeway

I am always curious as to what people like and dislike about my images and make a point of posting them online to see what people think and how they respond.  Sometimes the result of this practice really surprises me.  The funny thing is that most of my personal favorites in B&W are not well received by the public!  Yet those that I consider not as good get better reviews…

It does not matter what camera I choose to create with, Medium Format FIlm (Mamiya 645 AFDii) or digital (Fuji GFX 50r medium format), the output results are difficult to tell apart. I love working in film, its process from end to end defines art to me.  But I also love working in medium format digital as well.  It is a much shortened and simpler  process and only takes a fraction of the time when compared to film.  I think most of you will be hard pressed to pick the film/digital images that I am going to place in this post! So the source of the images make little difference to me.

Approaching Storm at Pawleys Island

Have you ever considered what it is about B&W photography that you are attracted to?  What about it grabs you?   For me, it is simple, the removal of color strips the scene to it soul allowing you to really become one with it.  It removes the confusion and gives a pure view of the scene!

Consider the image of the approaching storm above.  The clarity of the image draws me into the scene, the sharpness captures my interest and holds it.   The dark moody tones make me feel like I am still standing right there!

Pawleys Island Beach Crossover in the fog.

I am not saying color work is bad, rather that I personally enjoy working in monochrome and enjoying the finished images processed in B&W much more that color work.   I suppose that is why working in film is so addicting to me, everything about the process from working behind the camera, film processing, scanning and printing I find very enjoyable.  But with the introduction of the Fuji GFX 50R camera system I am equally thrilled!  You can shoot in both color and B&W on the fuji system. The real difference is that you can set it up with film emulation profiles in camera and generate and output true B&W RAW images!  I find that I like using the Acros/red profile in camera because it matches my film work with actual Acros film!   This gives me another entire workflow that matches my B&W film work 1:1! The fog image above in a good example of the ethereal nature that you can achieve when working in B&W.

Charlee Marie

The image above if Charlee Marie highlights this relationship between working with medium format Acros film and the medium format Fuji GFX 50r camera system.   The amazing tonality of the boat and sky capture my attention and will not let it go.  The subtle tonality of the wheel house is flawless.  Overall this is one of my favorite images produced by the 50R, capturing the heart and soul of the shrimp boat in a non cluttered fashion usually associated with them on the easy to use medium format digital 50R!  This particular image is one of my favorites from the 50R that has not been well received by the public, yet I cannot let it go…

Port Royal Shrimpers

The Port Royal Shrimpers is an example of everything coming together for a powerful image; Good Light, Clouds, Boats and reflective water plus being there!  Of all the images captured with the 50R this one has the highest number of likes and comments online.  Yes it is a powerful moody image but I am not sure if I personally like it more than the image above!

Daddys Girls, medium format Acros film

OK, on last image of Daddys Girls was taken last week on Acros Film on my 645 AFDII  using a deep red contrast filter so the sky is a little darker.  To me this is a powerful image and different from the digital work above it due to the deep red filter.  Yet all other aspects of the image match equally to the work generated on the 50R system.   

To me, this illustrates how well the film and digital systems can work together.  There are times when working in film is just not possible or practical during travel where the 50R would work much better and easier.

I am happy that each camera system can complement each other so closely!  It will make my life much easier and allow me to concentrate on creating art rather than on how I capture it!


As always please let me know what you think, I value your input!


The ART of creating MOOD


What Makes Ethereal Moody Images?

Kathy Dean, medium format film

This post is going to be a bit different from my otherwise technical (Geeky) posts of the past.  I am going to share my philosophy of creating MOOD in my art.

I spend a LOT of time studying the fine art photography of the past masters (Ansel and others) and current photographers.  I visit galleries, web sites like 500px scouring  for examples of the creative process that generates images that speak to me.   This takes up a lot of my time but I feel that it is a worthwhile investment to further my understanding of what makes great art that reaches out and grabs my attention!  I do NOT do this in order to copy others, (that is not my way) rather it is to understand what about an image makes it reach out and tweek my artistic desire!  You would think that after 55 years of personal photography that this would not be necessary, but if you think about it you will realize that life is learning and we never stop that process.  Sometimes it is re-learning forgotten lessons, other times it is about learning new lessons.  We all change and our tastes also change as we age, so to me this is a natural progression in our path in artistic endeavor.

I personally tend to work mostly in B&W Film, but do not limit myself to it.  I create as well in color both digitally and on film too, but my real passion is B&W. Here we are going to discuss only B&W and all of my examples are created on various 6×4.5 medium format camera systems because working with flim and the process of film motivates and enhances my creative process.  I am going to leave out the technical details of the images because I want you to really study the images without considering the technical aspects of the creative process.

Let us consider the image above of Kathy Dean, a shrimp boat in Port Royal, SC.    What about this image gives you pause, making you want to really study it?   Sit back and consider the mood of the image and what you are drawn to as you study it.  For me, it is the dark moody sky and reflections contrasted against the bright whites of the boats.  My eyes continuously circle around these details and re-settle on the boats again and again.  The dark sky and water create a moody ethereal frame that traps our attention on the boats themselves yet provides a scene free of the distractions of color

If we were standing there today with camera and tripod wouldn’t we be thinking that we could have a much better image with fluffy clouds?  Let me suggest that if indeed there were clouds the day I created this image that they too would have been a distraction from the mood of the image. 

I will honestly tell you that as I stood before this scene that it was my primary thought that this could be an amazing moody image provided that I set it up as a longer exposure to smooth the water and darken the sky and reflections.   In other words, I studied the scene, pondering what it was that drew me to it and how to use the camera (my tool) to create my vision! 

These are my secrets to successful fine art photography:

Stop, Look and Think about the scene:

  • Why are you attracted to it?
  • How do you compose for a simple yet powerful image free of distractions?
  • How to super charge the image with mood?
  • How to use the camera to create this vision?

Lindale Denim Mill, a study of extreme dynamic range in a single image…

Let’s take a look at another image, this one digital (yet another tool), and the camera on hand when visiting the inside of the Lindale denim mill in Georgia.  This is one of those  location that  will NEVER fail to deliver scenes full of wabi/sabi goodness full of amazing mood providing you approach it with the right motivation and mental tools!

Lindale Denim Dye Tank

I spent 7 hours here over the course of 2 days.  It was a power parade of mood that swamped my senses and at every single turn. I was continually stunned at what lay before me as I moved through the factory!  What more motivation could a fine art photography artist desire?  I slowed down, WAY DOWN and studied each and every hint of mood before me. 

For this scene, (Blue dye tank) I studied the dark moody ceiling and walls behind the pillars, the deep tank with its grungy details, but I particularly paid attention to the play of light coming through the windows and highlighting the entire scene!   I realized that in order to capture this scene with mood that I would need to control the sunlight and keep the dark areas from loosing detail.   I setup the camera to control both and average the entire composition.   This happened quite fast (remember 55 years of experience) and it only took ONE SINGLE EXPOSURE

To me, this scene has amazing flow that draws me in thru the lighted windows, walking around the exterior of the room and moving down the ladder.  My attention never leaves the room.  It has a wonderful dark mood and speaks to me of days long gone.   

What more can a photographer ask for in such a creation?

My path in creating this image:

  • I walked around the entire room several times, studying the elements that the scene contained.
  • I constantly asked myself;  “Mark, why do you like this?”  and “What do you actually like?”  I answered; “The dark mood broken into segments by the light coming thru the window and the LADDER!”
  • Can the camera I had capture the overall mood and range before me?  “YES!”
  • What is the best vantage? “Closer to the ladder!”
  • How best can I control the contrast and range of this image? “Multiple spot meter readings to shift the scenes entire dynamic range into that of the camera!”

After this it was just a simple matter of setting the the composition, exposure and capturing the image!


Ok one last example…  Daddy’s Girls…


Daddy’s Girls, medium format film

This is one of those scenes that I visit time and time again.  It is only a few hours from home down in Bluffton, SC (a location where my oldest son lives).  There is only one single boat at this commercial dock and processing plant.  There is a boat launch and pier close to the left, but  for for this shot I wanted a more head on view.  I got my son to take me out on his boat so that I could get this angle on a terribly stormy day. Dark and Stormy it was.  Heavy rain and wind, but these were the components that were in my vision so I suffered through it to get this image.  I took several shots of the scene (waves, no tripod and a moving boat) so I invested an entire roll of 16 images knowing that a lot of them would be blurry and out of focus.   Good thing too, I only got this one single sharp image but it was so worth the effort!

Do you see what I am getting at?  I KNEW what I wanted with this image, I knew what tool (camera) I wanted to use so I returned dozens of times here, re-evaluating again and again till I got what my vision demanded!   I have been here a hundred times over the past 4 years and was NEVER satisfied with the scene!

What my vision demanded:

  • Moody, Stormy Sky.
  • Bright light on the boat.
  • Cloud detail.
  • No other boats to clutter the scene at the launch.
  • Medium Format Film only.
  • No workmen on the boat.

So it took years of returning again and again until I got the scene that matched my vision!  But to me it was well worth it!  Will I stop returning?  Heavens no, you NEVER know what nature will provide you with so keep returning!

As always, I hope that you enjoyed this post!   Please consider leaving feedback and comments!


Another Film Dynamic Range Adjustment Post!


A Quick Dynamic Range Followup and Example

Hurricane Florence is coming… Spent all day today starting to get ready. But yesterday I stopped by the causeway bridge to Litchfield beach and shot 1 roll of FP4+ film on my Fuji GA645zi changing between the red R24 and R25 filter. I was looking to the North from the bridge. It is a very beautiful spot and scene.
This is one of my go to spots when I am looking for inspiration and it did not fail to deliver for me. I was heading home but decided to stop at the studio and put the film into the processor, wait the 20 min then hang it in the dryer overnight.
 

But…

When standing there looking at the clouds I realized that the whites were going to be blown so I subtracted 30 seconds from the development time to compress them down towards Zone 8 so that I could capture the entire dynamic range, then in scanning moved them back up a bit to place them closer to my memory of them and bring the blacks up a bit! I love the effect the deep red filter gives to the blue sky.

How did I do this you ask?  I am glad you asked!

With a hand held spot meter I measure the brightest white I desire texture in, then measured the darkest black for texture.  Pushed the average button on the meter and got the zone 5 reading along with a chart showing max and min.  This tells me that the whites will be blown out on the negative.  SO I adjusted my exposure to give texture (Zone 3) in the blacks I wanted and let the whites fall where they will.   In the processing knowing how far over exposed the whites are I can now adjust the developing time (-1N in this case) to compress the whites down to zone 8 (-30 seconds).  Easy!
In the scanning software (VueScan) you have the opportunity in the extended menus to again shift the black and white points up or down.  I simply adjusted both to expand the dynamic range back out to the range of the Gicle’e (RIP) printing system I use in my studio yet keep the whites from being blown out!
  1. Measure the range of the scene and determine if the film can capture it all
  2. Expose to move the blacks with texture to zone 3.
  3. Pick a -N developing time according to where the whites fell in the negative (1 stop for this one)
  4. Scan to keep the textured blacks at zone 3 and move the compressed whites back up where they belong in VueScan)


The Results:


The Causeway going to Litchfield Beach, SC

It was a pleasant and very satisfying endeavor and made me very happy today when I scanned this image on my way home from preparations.
 
Data: GW645zi – 55mm – Roll 95 – Fr 8 – Red 25 +3 Filter – f8 – 1_60 – FP4+ – Xtol Stock -30s – Wet Scan – T CI 50 – Litchfield Marsh- 2018-09-09
I know, this was a really short post, but I was really pleased with the image results and the entire process was one of those “By the seat of the pants” type of evolution.  I wanted to share again, now simple the process is for adjusting the range on film in development and scanning.  There will be yet another one of these in the future but it will be VERY detailed and perhaps even with a video!

As always please let me know what you think!

Controlling your Dynamic Range in B&W Film photography


Stormy Seas in a approaching storm!

Stormy Seas a the dock… 6×12 medium format Tmax 100 film

Dayi 6×12 showing the ground glass and shade and my custom dark cloth attached.

This Super Pano was taken on my Dayi 6×12 medium format view camera. Lens is a Rodenstock 90mm f/6.8 Super Grangdagon N and while it is a bit slow it is VERY sharp and quite beautiful!  This is a very different style of camera and will take 5 images per roll of 120 film. 


Dayi 6×12 Grand Glass Back

This is an amazing combination of a ground glass focus and calibrated distance focus system.


Dayi 6×12 with the Rodinstock 90mm f/8.6 installed showing the alternative, calibrated focusing system

Shrimp boats are one of several subjects that I will drive hundreds of miles away to photograph! I am very lucky to live so close to a lot of them locally! Because of the continuing loss of our shrimp fleets here I am both driven and inspired to document them every chance I have. You have to admit that they are very beautiful when done in B&W and what better way to document them if not film?

This was a very difficult shot to achieve! To get it I had to overcome the super bright sun coming over my shoulder highting the boat and buildings to the point that they were totally burned out. The storm in the background was dark and foreboding…
The lesson here is to learn and realize that you can control all aspects of your image’s exposure along with taming the dynamic range of the scene through use of thoughtful developing and scanning.
I used a Sekonic 758 to get these results by using  a combination of exposure averaging  with 6  one degree spot metered measurements, saving each reading in the meters memory then telling the meter to give me the zone 5 average which then became my base exposure.  The 758  then showed me the the exposure with a chart of any data over or under exposed thus out of the film’s dynamic range.
Knowing this, I then used a technique where you can either compress the the dynamic range of the image into a smaller space thus allowing the film to compensate for a wider dynamic range that it was designed for!  This is called +/-1N developing. You can change developing time down to compress the dynamic range of the image by squeezing the image down from the whites towards the blacks which compresses the highlights  into range!   The opposite is also true by going +N.   But for this image the -1N was enough.   I then then used another creative process during the wet mount film scanning by expanding the dynamic range to fit into the wider print profile by  +1 to the highlights in Viewscan to put them where I desired for a powerful and moody print.  There are a lot of books out there that will teach this technique, but my favorite is Creative Exposure Control by Les Meehan which will teach you the development side of the process.   The scanning side is easily done in Viewscan and there is a good book on that on Amazon. 
I will also expand upon this in future posts as well!

Rodenstock 90mm f/6.9 Grandagon N, while a slow lens it is super sharp and beautiful!

The wet mount scanning technique will be taught in a future post here along with a video on Youtube!  But to do it you will need an Epson 700, 750, 800 or 850 scanner as those are the only ones that the wet mount kit will fit!

 
Data: Dayi 6×12 – f32 .4s – Roll 4 F3- Avg Metering 6 measurements – Yellow Filter – Stormy Seas- Tmax 100 – Perceptol 1:1 at -1n  – 2018

As always please let me know what you think!

Beach Day For Lilly!


Exploring new things can be fun!


Let’s Get To It, Fuji GA645zi with FP4+ processed in Xtol Stock and Wet Mount Scanned

Well, we went last week (Ellen and I, Megan and the 2 grandkids Lilly and Jordan) for a beach day here in Pawleys Island South Carolina.   Meg asked for some images of Lilly’s reaction to the ocean!  I am really not one for hours on the beach but who can turn down a 17 month old babies reaction on B&W film?

I grabbed my Fuji GA645zi camera (auto focus, 4 position zoom, great meter and built in flash) with a roll of Ilford FP4+ film and we headed out!  Not a long trip since we live in Pawleys  so soon we were there.

Data: Fuji GA645zi using a yellow/green filter to bring out the skin tones and a bit of the sky and clouds with Ilford FP4+ film processed in Xtol stock and wet mount scanned today.

Lilly did not know what to think of it all but went into the water and quickly backed up.  Meg sat down with her and helped ease her into the concept of big water.  Pretty soon she was running around having great fun.   Normally I do not do a lot of posts of people or family but hey, you know film?  You got to honor the challenge!

Meg easing Lilly into the water! Fuji GA645zi with FP4+ processed in Xtol Stock and Wet Mount Scanned

Of course Jordan, my 9yo film photographer grandson is an old hand at this and just looked good at anything he did there!

Jordan my 9yo grandson film photographer!

I took only the one roll but saved one shot for  the local beach landscape!  Hey your there so you gotta do it right!

Dunes behind us!

As always, comments are welcome!  Let me know what you think.

Railroad Day Trip and the Fuji GA645zi


The Art Of Film Photography And Travel


Jordan standing on part of a giant Redwood tree on the top of the mountain


Day 1

Earlier this month Ellen and I took our 9yo grandson Jordan on a week long trip to the San Francisco area.  We did many things and visited some great sights! One of the most memorable was a 2 day visit to the Roaring Camp where the Big Trees and Pacific Railroad is!  They offered several train trips around the mountains and through the giant Redwoods. 

There also were two covered bridges in Felton, one in Roaring Camp itself and another a short distance away in the town. Here is the Roaring Camp bridge.

Roaring Camp Covered Bridge

Dixiana, a 160 yo steam train being lubed

Our first trip was on the Dixiann a 160 year old narrow gauge steam train designed to move ore down the mountains from the mines.  It was special in that it had geared drives to all of its wheels and while it could not move fast it could pull loads up and down the mountains and take as much as an 8% grade!.

The rail yard was full of amazing trains that were in various stages of repair or being torn down for parts. It was a photographers dream!  There was so many different parts, trains and cars around the yard that I could have spent hours and many rolls of 120 film there.   The film I did choose was Kodak Tmax 400.  The reason for this was the fact that I was in the mountains covered in giant Redwoods and there was not too much light!


Pacific Railroad Yard in Roaring Camp, Felton, CA

Dixiana, a 160 yo steam train arriving at the station to pick us up

Once it was time to board the train Jordan and I went down beside the tracks trying to get some good angles on the steam engine with its puffing smoke and steam. 

As it approached we were physically pushed aside by an foreign  woman and her daughter who then stood directly in front of us taking phone pictures. 

We were already setup with our film systems when they did this.  It was the only black mark on the day for us and caused enough anger for me to yell at them for being so rude but they simply did not care.  So this next image had to be majorly cropped to remove them from it. Some people are totally clueless and without a shred of common sense or decency.

If you take a look at the engine you will notice that there is really no dark smoke.  This is due to the fact that it has been converted to burn used motor oil!  There was a water town that it pulled up to and topped off its water level too.

The engine  had a central drive shaft that powered the gear drives to all of the wheels.  Next is another image of it getting ready to leave the top of the mountain on the ride back down to the station.

Dixiana, a 160 yo steam train getting ready to head down the mountain

There was another interesting covered bridge in Felton as well.  It was the tallest covered bridge that I have ever seen!   The town built a nice park around it.

Felton Covered Bridge, Tmax 400

Felton Covered Bridge, Tmax 400


Fuji GA645zi Medium Format Camera

Let’s take a bit of time to talk about the photography a bit…  On these two train trips, light was an issue as well as not being able to use a tripod.  As this was a week long trip and not photography based I chose the Fuji GA645zi medium format camera because of its light weight, 55mm to 90mm 4 position f/4.5 zoom lens, fast autofocus, accurate built in meter, Aperture, Shutter and Manual modes, internal flash and lightweight as the only camera I would take and carry. It is also tough with a solid titanium body!  In other places around California I was able to use a small carbon fiber travel tripod from Really RIght Stuff and then shutter speed became a non issue.

As I said earlier, ALL shots in this post were done on Tmax 400 due to it being difficult using a tripod as well as lower light levels in the Redwoods.   Normally in a situation where I have enough light or am able to use a tripod I will always choose Ilford FP4+ 125 ISO  film for its amazing sharpness, small grain and great contrasts.  I also shot with an orange filter whenever I could but sometime even that had to come off in order to keep a decent shutter speed.   Processing was done in Kodak Xtol stock in my FIlmomat automated table top film processor.   Once dried I used a wet mount scan process.  I find the Tmax films very easy to use and they give consistent results are easy to load on the reels due to their thick film base.  I also brought along some Velvia 100 film and managed to shoot a few rolls of that at the covered bridges and ocean scenes.


Day 2

TIme for the Beach train ride!  This was a 3 hour trip from the mountains down to the boardwalk along the beach in Santa Cruz! Of course Jordan liked this trip also because the boardwalk held a huge amusement park!   We had an hour to play there once we arrived but he was having so much fun that we decided to wait 4 extra hours for the last train back to Felton.  The train this time was a diesel, Gene O”lague #2641 that took us and we actually rode on tracks thru Santa Cruz proper!  I was pretty interesting and sad at the same time due to the VAST numbers of homeless people who had setup permanent camps along the tracks in the low mountains outside of town.

Gene O”Lague, the diesel that took us down the mountain to Santa Cruz for the beach trip

The train is shown here arriving to pick us up at the station.  It was huge and I managed to capture this one image of it arriving before a mob of people again ran out in front of me, oh well…  

The trip done out of the Redwoods was very interesting and we even went through a long tunnel as we came into Santa Cruz.  The tracks are actually down the center of the streets and was very slow do the traffic!  ALL of the people on the streets, in the cars and trucks waved continuously as we would pass.

After we arrived at the boardwalk the train powered down and sat there for an hour waiting for the first trip back to Felton.  This gave me ample time to do some detail shots of the train which I found very interesting.  This is my favorite of the roll!

Gene O”Lague, the diesel that took us down the mountain to Santa Cruz for the beach trip stopped at the boardwalk in Santa Cruz


Of course we were now at the boardwalk amusement park.  We were there a few days earlier (the park) but could not spend much time there for Jordan.  So as I said earlier we decided to add 4 extra hours here for him to ride and play.  It was time well spent and he enjoyed the day.

Sky RIding on the boardwalk in Santa Cruz during the Beach train ride

Ellen & Jordan

All in all the train rides and park were a nice time on the trip for us all.  It was both fun and very tiring but I managed to capture 14 rolls of B&W 120 film and 4 of color slides.  I continue to evolve in my technique for travel photography with the inclusion of more capable travel medium format camera systems which makes me VERY happy.   I hope to travel much more with Ellen in the future and once in a while I will take my larger Mamiya 645AFDii camera and lenses there is good reason to stick to the lighter Fuji GA645zi system with its single zoom lens!

Things learned:

  • While a wider range of interchangeable lenses would be nice, the camera/lenses are just too heavy to travel with and carry…
  • I love rangefinders but an auto focus made my photography much more fun and faster with my family in tow…
  • Take more film…
  • Split the B&W film evenly between slow and fast.  Stick with Tmax 400 and Ilford TF4+ 125…
  • Take along a faster slide film…
  • Get a bigger dark bag to hold exposed film…
  • Did I say take more film?  Yep, but it is a biggie!


Thanks for bearing with me thru this ultra long post.  While it does come across as more of a family vacation (which it is) post it really does go into ways to make such a easier and funner experience!


As always, please let me know what you think of it all!


The Accidental Photograph!


Sometimes even the best of us get surprised!


The Carson Elizabeth

Fuji GF670 Medium Format

Fuji GF670

Now, here is one image that I REALLY like! This is a 6×7 negative from my Fuji GF670, a folding rangefinder camera with a really bright rangefinder and a fixed 80mm Voigtlander lens shot on Rollei IR400 film and processed yesterday in Xtol stock and wet mount scanned today… 

Sounds normal right?   Well this was a VERY OLD roll of film, and has been sitting in my shop for over a year marked “Stand Develop” ( a special developing process where you use Rodinal 1:100 in the tank for an hour with no agitation that works on all B&W films of different ISO values) because I forgot what ISO I shot it at!  I actually got tired of seeing it in my to do can in the fridge and yesterday threw it onto a 2 film reel with a roll of  Ilford FP4+ film and set up my Filmomat for the FP4! The FP4+ turned out as expected,  but the IR400  was a complete surprise.   

Carson Elizabeth, Shrimper in Georgetown, SC on 120 film

There was only one good image from the IR400 but OMG was it ever good! Just looking at it gives me the hot sweats!! As I looked at the processed roll of IR400 I realize that I had changed ISO mid roll and that is why I marked it stand. The other images on the IR400 were not worthy of scanning  but this single image still made it a  big win for me!

Oh, for the curious, my FIlmomat is a computerized film developing machine that is the tabletop sized and will do 35mm, 120, 4×5 and 5×7 films.  For the 120 it will do 2 rolls at a time.    Here is a video that shows it in action…


Data: GF670 with 80mm lens and Rollei IR400 with no filter processed as FP4+ yesterday and wet mount scanned today.

Goodness, I had forgotten how difficult the film is to handle with its very thin film base!

For those of you who are interested in the fine art of FILM PHOTOGRAPHY AND SELF PROCESSING, join me on my new G+ page HERE and learn and share!

Willy and the Pelican


A Lesson On Life!


WIlly and the Pelican.. Southport, NC

 
I discovered Willy (his first name is Wet) at Fishy Fishy on the marsh front in Southport while Jamie Konarski Davidson and I were there last weekend and kindly asked the pelican flying overhead to land on Willy. He said that Willy was to small and his landing there would make Willy rock and ruin my shot so he landed on the larger boat then struck a pose for me. A really considerate bird that Pelican was! The scene was busy yet pleasing to me so I sat and talked to the Pelican (they are so chatty) for a bit while I shot the roll of film!
 
When I was done and started to leave the pelican squawked in his deep male pelican dialect “ what about compensation for pulling this scene together for you?” So i asked the fish monger behind me for a pelican sized payment and gave it to my birdie friend who promptly grabbed it and flew away without a word! I lowered my head in disappointment knowing that I should not have been hurt as all of the creatures live and die in the entitlement mentality! Oh well…

So… Here is Willy and the Pelican!

Willy and the Pelican

This was done with my Mamiya 645AFDii and a 45mm lens using FP4+ film processed in Xtol stock in my Filmomat processor,  then wet mount scanned. Full data is below:
 
BTW, WIlly says he is looking forward to seeing all of you who are coming to the workshop there at the end of September!
 
645 AFD2 – 45mm – Roll 93 Fr 7 – 1_60 f11 – Orange Filter – Willy and the Pelican- FP4 125 – Xtol Stock – Filmomat – D-CI 55- – Scan Exp Lock – Wet Mount – 2018-08-25

The Amazing (and affordable) Dayi 6×12 Medium Format System!


BIGGER is BETTER!


This is the Causeway to the Litchfield Inn in Pawleys Island.
100TMX processed in Xtol 1:1. Yellow filter, f/22 at 1 second metered on the white roof on the distant boat house where the water seems to end an placing that in zone 7 to 4 seconds then to 6 seconds for reciprocity..


Well… Yes, I have a NEW medium format camera system! Not new used, but NEW NEW!

It is the Dayi 6×12 and is custom made in China for each order.  It is very affordable, the camera, lens cone (adjusted for you lens ahead of time) film back, focus screen and shade, viewfinder and a Arco swiss mounting foot!  All in all this ran me around $1000 and took 2 months from payment to delivery.  There are several companies selling them but I chose ecbuyonline2008 on Ebay, contacted them and then dealt directly with them for a nice discount. They provided a direct email at ecbuyonline@foxmail.com.

Dayi 6×12 showing the ground glass and shade and my custom dark cloth attatched.

Ok, the camera itself is very well balanced and easy to use.  As with most types of cameras of this design it uses a lens cone cut specifically for the focal length of the lens used.  If you use a different length lens as a 2nd then you will need another cone designed for it as well.

Dayi 6×12 showing the film back and ground glass

The focus is controlled by a CALIBRATED helical mount that gives very fine control of the focus.  Because it is calibrated, you can just dial in the distance and forget the ground glass.  Me?  Not so much.  My eyes are not calibrated very good.  Now, a cheap laser rangefinder would be just the thing.  Fire it, dial in the distance and shoot!  I use the ground glass as my focus operation.  I have a custom made dark cloth that fits the glass frame and works very well.  I have a nice 8x loupe that I use to make up for my old eyes!


There are calibration screws around the outside edge of the lens cone and you can see the small hole for one at the end of the video above.  These allow you to set the infinity point and place the lens in the correct position.  You can find a tutorial HERE for this process.

Lenses that will work on this camera can be found HERE.

The camera is a bit heavy and not suited to handheld work, but it can be done.  It is a VERY well designed and built camera system and has ZERO light leaks.

When the camera first arrived, the film holder was scratching the surface of the film emulsion.

Here is the issue, a spring next to a roller that is too high in the film plane with rough edges! It is the bright silver line under the roller.  See how it is bent up in the center?  It actually touched the film.

The complete assembly

I took it apart and realized that a spring was adjusted too high on the film holder back and touching the film.  It was a simple adjustment to fix this but I still sent an email about it and a few days later this video arrived showing how they said to fix the issue which is exactly what I had found!

This goes to prove that they are responsive to customer complaints, problems or suggestions!  That is a big plus in my book!

The system is simply a joy to use.  It is bright in the corners (of course that is lens dependent) and the focus is spot on!  I have put about 10 rolls of film thru it so far including some Ektar 100 (which I have not processed yet but have the chemistry). Now that the scratching issue is fixed I see a great future for the camera in my kit.

The folks at the company in Hong Kong are easy to work with and very responsive  over email.   I highly recommend them.  They have MANY other cameras for sale also including a larger 6×17 version of this one.

Stormy Seas, Dayi 6×12, not the best composition but a good example of the quality from the camera!


I hope you enjoyed this short post on the new pano camera system.  There will be more following!

The Back Story on Kodak Ektachrome


Ahh this is SO exciting!

This is HOME, I came from Kodak Park in Rochester, NY!  I worked and designed on both film and paper manufacturing lines so this is special for me!  So this is short and sweet, just click on the 2 boxes below for the full story!

A WONDERFUL audio cast with the FULL story:

And this video:

Testing the new Fuji GA645zi Medium Format Camera


A Light Weight 120 Autofocus Travel Camera with a Zoom Lens!

Fuji GA645zi

Fuji GA645zi

Well…. I have been waiting to test out my new Fuji GA645zi camera for about a week now but due to family issues I have been unable to do so.
I finally made it out to visit the shrimp boats just west of Tybee Island and the light house there! The sky was very plain with no clouds but I really needed to test this camera out. I put on a yellow filter to slightly darken the sky and used Fuji Acros 100 film.
 
This is the shrimper Agnes Marie.

Shrimp Boat Agnes Marie

Shrimp Boat Agnes Marie

Data:
Fuji GA645zi – Acros 100 – f19 1-30 Plus 1 EV, Yellow Filter 9-18-17 – Wet Mount scanned – Agnes Marie – 2017-10-27. Processed in Xtol 1:1.

Fuji GA645zi

Fuji GA645zi

Please note that along the bottom of the frame ALL of the exposure data is recorded!  This is a feature that I really like.

 
The auto focus system is very robust, fast and dead on! It is not as loud as people claimed and I really enjoyed using it! I had an issue with my first roll in that it did not clear the take up reel and bulged out fogging most of the roll. Bad me, I used the one that came with the camera, so I then used the reel that the Acros came on and all is well there now. 
 
I know that the sky is plain but I am still happy with the results!
 
I am looking at this camera as a small light 120 travel camera. I know that the 6×4.5 negative is smaller than my 6x7and 6×9 systems but it still gives a large enough negative for sizable prints.  An other nice feature is that the camera has a 7 position zoom quasi zoom lens which again makes it attractive for travel!   
I only had time to wet mount scan 1 image today but I put 4 rolls of film thru it so there will be more on the way including the Tybee Lighthouse!
 

Full Eclipse at Pawleys Island, SC


Never 2nd guess yourself on the worthiness of an image…

Full Eclipse, Pawleys Island, SC . 2017

 
Honestly, I was NOT inspired to photograph this event in the least…
 

Jordan, my 8 year old grandson

There were going to be MILLIONS of photographers out there shooting the same thing or at least trying. So I asked myself why bother to get the same shot everyone else would have?  But my 8 year old photographer grandson came over with viewing glasses so we sat out in chairs in the front of our house (100% eclipse) and watched it happen

The longer it went on the more excited I got, then when the light started fading I decided to fire off a few shots when it reached 100%.
 

Canon 70-300L

I had a Sony A6500 with a Canon 70-300L nearby so I got up and got the camera from my truck and shot handheld at ISO  4000, f/8 and 1/1000s to keep a sharp handheld shot. There was no time to setup a tripod!  I Put the camera in high speed mode and fired off about 30 images then put the camera down and forgot about it till last night. On viewing the images is was stunned by the sharpness of them all and while I had several of the diamond ring I decided upon this one for one reason:

 
Look closely on the right side of the sun/moon and you can see a solar flare jetting out to the right. It has an orange color…

So, there is a lesson to be learned here (or re-learned in my case…), do not take the desire/inspiration or lack there of for granted, take the time and get the shot and later on decide upon whether or not it was worth your time.  It is always best to have it in the can rather than not.
I am glad that I even took the minimal effort to do this.  Imagine what I could have done had I setup properly with a 600mm lens ahead of time?

How many of you have made this same mistake?  Take my example to heart and always have a camera nearby when you are viewing something that might be worth capturing whether or not you have a desire to do so… One day you might be grateful for doing so!

Testing the New Kolari Vision AR 720nm Screw On Filter


720nm Medium Format Film Photography with Rollei IR400 Film


Tomotley Plantation in 720nm Infrared with Rollei IR400 film and the Kolari Vision 720nm Filter

Infrared FILM photography has always been on the difficult side, but not because of lack for film because there are several films on the market.  Rather it is due to the poor quality of the available 720nm filters on the market.   

Kolari 720nm FIlter

Recently Kolari Vision www.kolarivision.com has come out with a new series of infrared filters with their AR (anti reflection) that stop or greatly reduce hot spots in the center of your film or digital sensor.  These hot spots are due to the various coatings, paint and other reflective coatings on the glass elements and coatings on inside of your lenses causing the light to bounce back and forth several times then hit the film dead center causing the hot spot.    

The main filter on the market has been the Hoya R72 filter which works but gives a low contrast washed out image.   Along come the new Kolari filter and now I am getting more contrast and even images with greatly reduced hot spots.  AMAZING!


So lets take a look at the image above.  This is the Tomotley Plantation about 20 min west of Beaufort, SC and  was taken with the Rollei IR400 film rated at 720nm.  Without a IR filter the ISO is 400 and the emulsion generates a very good likeness of Kodak TriX 400 film.  If you add the 720nm filter the ISO drops down to 12 or 6  but you get the amazing whites on the grass and leaves.  You even get the Wood Effect where the green items BLOOM  out with an etherial soft white energy on the image!

Few things beat a beautiful sunrise photographed in color when you want to create a dramatic image. The same scene photographed in infrared may be disappointing unless there’s some  IR reflective subject matter (we’re talking about deciduous trees here) to add interest. That’s because of the “Wood Effect,” which is the bright, white reproduction of the chlorophyll layer of deciduous plants. The effect is named after infrared photography pioneer Robert W. Wood (1868-1955) and not after the material wood which does not strongly reflect infrared.

Normally the Wood Effect is difficult to achieve at 720nm and is better seen at 800nm and and above.  I have been very happy with this new filter from Kolari in combination with the Rollei IR400 film because I am constantly getting the effect plus deep contrasty images.  It simply works as expected which is way more than I can say for others on the market!


Technical Data:

  • Fuji GF 670 Medium Format (120) folding Rangefinder with a Voigtlander 85mm Color Scopar lens.  
  • Kolari 720nm AR filter
  • ISO at 12 and 6, both are close to perfect because they are only 1 stop apart.
  • Aperture: f/32
  • Tripod mounted

Development:

  • Ilford Perceptol Stock mixture 1:0, 20c, 14 min with 5 seconds of agitation every min.
  • Water Rinse
  • Stop Bath
  • Ilford Quick Fix for 5 min with 5 seconds of agitation every min.
  • Water Rinse
  • Clearing Wash
  • Water rinse for 10 min
  • Distilled Water rinse with 3 drops of wetting solution
  • Dried overnight in filtered Mistral Drying Cabinet.
  • Wet mount scanned on a Epson 850 pro at 6400dpi.

If you are considering working in 720nm whether in film or digital I highly recommend this new filter from Kolari!


Finding Myself In The Old Ways…


It seems that I am addicted to film…

Miss Lue & A Hungry Egret

I still shoot with digital (A7RII) and love the look and capability of it, but FILM is what I go to every time I go out shooting… It is Terrible and exciting at the same time! It is so bad that I am looking for another freezer to store my excess film stock!

This is (again) Stormy Seas in Georgetown, SC

This is (again) Stormy Seas in Georgetown, SC (perhaps the most photographed boat in the Low Country). I have hundreds of images of it but I am pulled to photograph her in B&W film each and every time I am in Georgetown. There is something about her lines and textures that inspire me to document her life, and I have for years. Yes I will visit ANY shrimp boat (or grist mill for that matter) and each and every time I visit I see something different and unique… Yep addicted!

DATA:

The image was taken about 5 days ago on a 6×9 Fuji GW 690 II using medium format Fuji Acros 100 film and a red filter, developed in Perceptol 1:1 and Wet Mount scanned on a Epson 850 pro. The 6×9 format will give me 8 images per roll and I will usually scan 2 or 3 per roll, but I am very critical and selective because the wet scan process takes about 3/4 hour per scan!

The top image is near Stormy Seas in Georgetown, about 2 blocks away at another commercial dock and seafood house.  I have shot this a hundred times on both digital and film, but never have I captured such a pleasing image  as this.  It is to me a more enriching image full of mood, contrasts and tells a story.  I pleases me to no end the tell the story on an old FILM camera of an old boat and failing lifestyle just as the shrimp boat is in the background and the Egret in the foreground telling a different yet the same story!

There is also the consideration that is tied to the process of working in film.  It is slower and much more deliberate, a truer work of love in that you control every single step of the process…

  • Film choice (Kodak Tmax 100, Tmax 400, Fuji Acros 100 or Rollei IR400)
  • Camera and lens choice (Medium or Large Format)
  • Considering the composition and lines.  
  • Getting the exposure dead on (how many of you do that in digital?)
  • Adjusting for contrast and detail in shadows or highlights.
  • Film development and processing for highlights or shadows (another complete immersion of self discovery)
  • Drying (yep at lest 24 hours in a dust free drying cabinet)
  • Choosing the best image for exposure, sharpness, composition, contrasts, lines, dust & hair and so on..)
  • Wet scanning (at least a 1/2 to 3/4 hour project per shot)
  • Cleaning up on the computer by removing dust and hair and adding a bit of contrast)

All in all, the top image took about a week to complete from end to end!  I simply love the process, being immersed in it and becoming one in the creative process.   Yes it is slow but when I am done it is a total representation of MY PERSONAL VISION!

Film is making a HUGE come back in the world of photography!  So much so that you will be shocked when you visit Ebay and look at the prices of old film cameras and systems!   All of the major film makers in the world are increasing their production of films and even Kodak is bringing back discontinued film products!   New film companies like New55, Impossible Project, and FILM FERRANIA have opened up and are making emulsions!

Developing has never been easier, there are many mail order labs out there but you can process your own film in your kitchen with very little effort and investment!  You will need:

  • Dark Tent or changing bag to move your film to a daylight tank.
  • Daylight tank (I reccomend a Stainless Steel tank with steel developing reels by Hewes)
  • Distilled Water
  • Developer ( I recommend Perceptol by Ilford)
  • Stop Bath
  • Fixer
  • Wash
  • Water Rinse
  • Distilled water rinse with wetting agent
  • Clips to dry your film in your bathroom shower
  • A flat bed scanner like Epson 500, 600, 700, 800 or 850)

Total you are looking at about $120 for everything accept the scanner!   There are great videos on Youtube that will take you thru every step in the process!

Tybee Island Light, Kodak Tmax 100 FIlm on a Fuji GW 690 II camera.

The image above of the Tybee Island Lighthouse was taken last month on Kodak Tmax 100 rated at 50 ISO  on the 6×9 format medium format Fuji System.  It was hot and the area full of tourists, even up on the top of the lighthouse itself!  Still the act of creating this image was both fun and fulfilling and I walked away with exactly what I envisioned as I stood there looking at the scene!

I especially love shooting with Medium Format cameras.  They are easier to travel with and the negatives are large enough to give amazing prints.  I do have 3 4×5 large format cameras also that are great fun to you but as you can imagine, they are difficult to travel with.  Once in a great while I will shoot with a 35mm camera, usually smaller rangefinder that were sold in the 60’s and 70’s!

Medium Format:

  • Fuji GF 670 (this is my travel camera in 6×7 format with a 85mm lens that folds up into a thin light camera)
  • Fuji GW 690II (this is a 6×9 format camera with a 90mm lens and a bit larger and better built than the GF camera)
  • Fuji GW 690 III (a newer version of the 690II)

Large Format:

  • Shen Hao 4×5 Cherry Field Camera with 5 lenses and film adapters for also using 120 film.
  • Polaroid 900 converted to 4×5 with a 150mm Fujinon lens.  Think of 4×5 travel camera!
  • Polaroid 110B converted to 4×5 with a 90mm Schneider Angulon lens, again travel!

So, while film does indeed require much more effort over digital, the results simply cannot be compared.   These medium format negatives have a native resolution to create a 71×53 inch print without upsizing it at all!  The amount of detail is simply stunning and more importantly (at least t me) is the fact that the process become a Zen like activity in creation!

I hope that you enjoyed this post but more importantly to me at least that you considered my words on the creative process and taking complete control of it!